Thursday, January 31, 2008

Splitcoaststampers Sketch Challenge

Yesterday I tried out the Sketch Challenge on Splitcoaststampers. I ended up making three cards by the end of the night. I kept coming up with different variations using the same card stock. Plus, I had some 4 1/4" square Chocolate Chip card bases that I had cut and scored for a stamp class and wanted to use up.

All cards are 4.25 x 4.25

Card #1

On this card I was almost done and I realized that I hadn't stamped at all. So I decided to stamp the swirl on the Not Quite Navy Strip. Token stamping done.

Supplies:

Stamps: Baroqu Motifs (swirl)
Paper: Chocolate Chip, Whisper White, double sided Designer Paper (Bohemia line from My Mind's Eye)
Ink: Not Quite Navy, Chocolate Chip
Accessories: Distresser (Cutter Kit), Sponge Dauber, Chocolate Chip Grosgrain Ribbon, Pewter Brad (Dollarama), Flower (Darico), Glue Dot

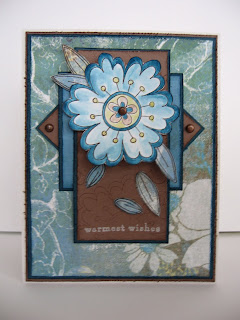
Card #2
On this card I inked up French Script with VersaMark, stamped on the blue side of the Designer Paper and embossed with Clear Embossing Powder. I taped the more patterned side of the same DP to a strip of Whisper White card stock and stamped "warmest wishes" on the bottom right side. I sponge daubed the edges in Not Quite Navy, didn't like how it looked so I went over it with Chocolate Chip. Still wasn't happy with it, so sponged over all the white with Not Quite Navy. And STILL wasn't happy with it so I embossed that piece with the Clear Embossing Powder and then stamped in Chocolate Chip over top - both times with the French Script background stamp.

The brown Primas weren't an exact match to Chocolate Chip so I just sponged the flowers with Chocolate Chip. I also sponged the edges of the white flower.

Supplies:

Stamps: So Many Sayings, French Script

Paper: Chocolate Chip, Old Olive, Whisper White, double sided Designer Paper (Bohemia line from My Mind's Eye)
Ink: Not Quite Navy, Chocolate Chip, VersaMark
Accessories: Flowers (Prima), Antique Copper Brads (makingmemories), Paper Piercer, Mat Pack, Clear Embossing Powder, Glue Dots, Sponge Dauber, Sponge

Card #3

On the background square, I embossed it with VersaMark and Clear Embossing Powder, distressed the edges and directly inked them the Whisper White ink. I also used the ink pad to ink the edges of the Chocolate Chip card base. I tied the ribbon around the front of the entire card base.

For the flower, I stamped Whisper White on Chocolate Chip. Then I used Not Quite Navy Classic ink with the French Script and very quickly embossed it with Clear Embossing Powder. (It actually worked!?!) I tried the same thing again, but with Old Olive Classic ink. Unfortunately, this time it did not work. By using Craft ink, you would be guaranteed that the embossing powder would stick. It was worth a try though. I made two smaller flowers from the same set in a similar way. I attached them to the large flower with a brad, placed two dimensionals on the back and then added it to the card.

Supplies:

Stamps: Fabulous Flowers, French Script, So Many Sayings
Paper: Chocolate Chip, Old Olive, double sided Designer Paper (Bohemia line from My Mind's Eye)
Ink: Whisper White, VersaMark, Old Olive, Not Quite Navy
Accessories: Distresser (Cutter Kit), Clear Embossing Powder, Paper Piercer, Mat Pack, Antique Copper Brad, Dimensionals, Chocolate Chip 15/16" Satin Ribbon

I was getting low on Birthday cards, so now I have a few more.

Thanks for stopping by.
Tuesday, January 29, 2008

A Sketch for You to Try


This last weekend I tried out i {heart} to stamp's Sketch For You To Try. You can view the sketch HERE.

I don't think I will be as long winded as I was on the last post. See here are just a few things to take note of:

I stamped the star from the Studio G Clear Stamps in Cool Caribbean ink, popped it up on a dimensional, stuck it to the card and then added Crystal Effects to it. Crystal Effects is usually the last thing I do to a card. That way I know I won't smudge it and mess up the card.

I used a Stamp-a-ma-jig with the stamped circles from All In A Row. I wanted to make sure that they were placed in the center of the Old Olive strip of card stock.

The "just for you" sentiment is layered with three circles. I used a Chocolate Chip marker to make little lines around the bottom 2"circle. It helps tie it in with the circles with lines on the Designer Paper.

After making this card, there is something I discovered about my "card making skills". I think I find it easier using designer paper that has smaller patterns on it rather than large ones. Like these large circles. I like the end result better when I've used patterns that are more subtle and not as bold. But it is always good to try something new.

Well, that's it for now.

Supplies:

Stamps: All In A Row, enjoy (heidi swapp), just for you & star (studio g clear stamp)
Paper: Double-sided Designer Paper (unknown, I got it from
Alli Mile's scrap pile), Whisper White, Chocolate Chip, Old Olive
Ink: Chocolate Chip, Old Olive, Cool Caribbean,
Accessories: Chocolate Chip Marker, Dimensionals, Crystal Effects, Chocolate Chip Grosgrain Ribbon, 3/4" Circle Punch, 1 1/4" Circle Punch, 2" Circle Punch (Marvy), Stamp-a-ma-jig

4.25 x 5.5 card

Thanks for stopping by.

Monday, January 28, 2008

Baroque in Blue


I seem to get a lot of my ideas on what to make for a card from either perusing my favourite blogs or using card sketches. This last week I saw a card that Beate made that I really liked a lot. I decided that instead of using it as inspiration I was going to see if I could make the same card (I hope that is OK and I'm not breaking any rules?!?)....but with a different stamp set since I don't have Back to Backrounds. I used the same dimensions that Beate used, but as I was working on the card I began to make small changes mostly due to the fact that I'd make mistakes and had to "fix" them). LOL

Usually I start a card with the stamped main image. This time I began from the bottom up. Maybe that is why this card took me an hour and a half to make. It felt like I was working backwards. After I measured, cut, scored and rounded two corners of the Always Artichoke card stock, I went to find the Chocolate Chip card stock and realized that I was running low. Oh no!! Because I love that colour and use it so often, I decided that I had better hoard it and try something else. So I went with Close to Cocoa. After I cut it, I got my Corner Rounder and punched the two sides. Ooops. I punched the wrong two sides...according to Beate's card. I had to then punch another corner so it would match with the Always Artichoke card base. Next I got out the Bashful Blue, stamped it first with the swirl from Barque Motif and then the Canvas Background Stamp, finally sponging the edges with Chocolate Chip. I also added a the largest photo corner from the SU photo corner punch and added three Antique Copper Brads.
Next I worked on the main image. I used the swirl in Always Artichoke ink, first stamping off on a scrap piece of paper then stamping on the Very Vanilla card stock. On another piece of Very Vanilla, I stamped the square medallion in Chocolate Chip and cut it out. Oh, I just remembered, that I first tried it in Close to Cocoa but it didn't seem to pop out visually. Too blah. Yes, this was turning out to be a long process. I then used the tiny flower, stamped it with Bashful Blue randomly over the Vanilla swirled piece. I also stamped it on a scrap of Vanilla cut it out, attached it to the medallion with an Antique Copper Brad and stuck it on with a dimensional.

To complete the card, I stamped "Thinking of You" in Chocolate Chip over the stamped-off Artichoke swirls. (I wanted a sentiment on the front of the card, but next time I think I will put it in a different place. It looks to busy and the words look like they are hiding in the vines.) I paper pierced the Bashful Blue card stock and a corner of the main stamped image on Vanilla. I sponged the edges of the Vanilla in Close to Cocoa. I tied a Chocolate Chip 5/8" Grosgrain Ribbon and FINALLY used a two-way glue pen and Dazzling Diamond Glitter on the Medallion. Whew! It's done!

Here is a close-up of the medallion with the glitter.


So that is the whole process I went through to make this card. Do cards ever take you that long to make? I hope I'm not the only one.

Supplies:

Stamps: Baroque Motifs, Warmest Regards, Canvas BG
Paper: Always Artichoke, Close to Cocoa, Very Vanilla, Bashful Blue
Ink: Chocolate Chip, Close to Cocoa, Bashful Blue, Always Artichoke
Accessories: Chocolate Chip 5/8" Grosgrain Ribbon, Antique Copper Brads, Sponge Dauber, Dimensional, Corner Rounder Punch, Photo Corner Punch, Paper Piercer, Mat Pack

5 x 5.25 card

Thanks for stopping by.

Friday, January 25, 2008

Ribbon Flower


Last night as I was browsing my favourite blogs and I came across a ribbon card on by Kristina on kwernerdesign (look under her January 21 post). I thought this was a very neat technique and decided to try it out. She has a video tutorial which is quite helpful.

I noticed during the video, Kristina made a hole in the paper with a paper piercer and it took a bit of fiddling to get the ribbon through. So instead, I used the 1/8" hand held punch to make my holes. As a result, I had to "fluff" the ribbon up a bit so that the holes would not show. Next time I will try to place my holes a bit better so the flower doesn't look quite as lopsided. I paper pierced holes to make some swirls just like Kristina did, as well as raising the main image on dimensionals.

There are a few things I did change slightly from her design. I framed the main image with Bashful Blue a little larger in width so I could add a straight line of holes and the sentiment "praying for you". I also used the Certainly Celery Designer Series Paper. To finish it off, I distressed the the edges of the card stock and then sponged it in either Old Olive or Bashful Blue, coordinating with the card stock.

This card took about half an hour and was a lot of fun to make.

Supplies:

Stamps: So Many Sayings
Paper: Old Olive, Certainly Celery Designer Series Paper, Bashful Blue, Whisper White
Ink: Old Olive, Bashful Blue
Accessories: Paper Piercer, Mat Pack, Dimensionals, Olive Satin Ribbon (Gale's), Bashful Blue Taffeta Ribbon, Sponge Dauber, Distresser (Cutter Kit)

4.25 x 5.5 card

Thanks for stopping by.

Tuesday, January 22, 2008

Weekend Sketch Challenge #31

Lately it seems like I am having a hard time coming up with inspiration for making a card. It has been taking me a looong time to come up with an idea. Take this Weekend Sketch Challenge of Beate's, for example. I looked at the sketch on Friday and finally came up with something yesterday. Maybe my mind has been on other things. It think that is it. On Thursday I am leading a Moms' group in making a "photo memory page" that can be framed. So I have been busy preparing for that in the last week or so.
In this card, I combined two things: the Weekend Sketch Challenge and the Faux Silk Technique, also by Beate. This last week I came across some tissue paper and saved it specificaly to try out this technique. And it was easier than I thought it would be.

I stamped the flower images with Brown Stazon and then used the Aquapainter in Old Olive and Creamy Caramel to colour them in. You might notice that parts of the flower look pink. Well, that is a fluke. I was colouring on top of a hot pink piece of card stock and it picked up that colour as well. I guess that is one reason Michael's card stock is so cheap....not the best quality wouldn't you say?!? But I do like how it turned out. I then followed the rest of the instructions of the tutorial to finish the faux silk look and placed it on top of Creamy Caramel card stock.

I inked up my background Paisley stamp with Chocolate Chip and stamped it on Close to Cocoa card stock. Tied the 15/16" Chocolate Chip Satin Ribbon around it, poked three holes in it....very carefully.... and added three brads.

Lastly I stamped "celebrate" in Chocolate Chip on Creamy Caramel cardstock, cut it out, since I don't have an oval punch and placed an Oval Chipboard Label Holder over top and secured it with two brads.

Once I finally "got inspired" it came together fairly quickly.

Supplies:

Stamps: Nature Stamps by Rhonda Farrer (Autumn Leaves), So Many Sayings, Paisley BG
Paper: Chocolate Chip, Close to Cocoa, Creamy Caramel, Whisper White, White Tissue Paper
Ink: Chocolate Chip, Creamy Caramel, Old Olive, Brown Stazon
Accessories: Aquapainter, Glue stick, Antique Copper Brads, 15/16" Chocolate Chip Ribbon (SU Theatre Ribbon Originals), Paper Piercer, Chipboard Label Holder (Dollarama)

4.25 x 5.5 card

Thanks for stopping by.

Thursday, January 17, 2008

Finally...The Third Installment of my Inspiration Attempt

Yes, this is finally a post for the third card I made after the holidays when I was trying to get inspired and into the swing of card making again. That was about a week and a half ago. Let's see if I remember how I made this card. LOL

I made this card after I made the "Cupcake Card". This one was also inspired by Natasha's card, as well as Laurie's card. (The bottom part with the ribbon).

First I stamped the flower from Time Well Spent on Whisper White, coloured it with blender pens and then cut it out. I stamped the Vellum card stock with the dotted argyle background stamp from Looks Like Spring in Whisper White craft ink. I placed it on top of Old Olive cs, then on the Nook Circles patterned paper. I taped the flowers on top of the vellum, punched holes with the crop-o-dile and added the pewter jumbo brads. Finally I taped it all to the pink side of that same patterned paper.

For the sentiment, I stamped "Happy Birthday" on a small strip of vellum. Punched out circles, folded it over the ends of the vellum and carefully taped it down on the inside so that it was secure. Then I punched a 1/8" hole through the Old Olive and vellum card stock, completing the card by tying the ribbon through the holes. At some point I used glue dots behind the old olive half circles and ribbon just to secure it even more.

Well, there you go. Now let's hope, in the future, it doesn't take three tries to be inspired.

Supplies:

Stamps: Time Well Spent, It's Your Birthday, Looks Like Spring
Paper: Whisper White, Old Olive, Vellum Card Stock, Nook Circles Double-sided Patterned Paper (Chatterbox)
Ink: Rose Red, Pretty in Pink, Whisper White Craft, Old Olive
Accessories: Pewter Jumbo Brads, Crop-o-dile, 3/4" Circle Punch, 1/8" Hand Held Punch, Olive Satin Ribbon, Mini glue dots

4.25 x 5.5 card

Thanks for stopping by.

Monday, January 14, 2008

Weekend Sketch Challenge # 30


On Friday I looked up Beate's Weekend Sketch Challenge first thing in the morning. I was stumped! I didn't know how I would make a card out of this sketch. But I tried it anyways and it turned out hideous. I was thinking I would post it just so you could see how awful it looked, but luckily I didn't take a picture of it. Then, thankfully, I came up with an idea late Saturday afternoon. (It was really bugging me that I couldn't come up with "the inspiration".) Because I had such a busy weekend, I was able to finish it on Sunday afternoon, right before we left for Altona for a family get-together.
So here it is.....Taa-Daa. It is a fairly straight forward card; no fancy techniques. One thing to take note of though - I stamped the small leaf from Time Well Spent stamp set on the strip of Certainly Celery card stock. Not sure if you can see that in the picture.

Supplies:

Stamps: Time Well Spent, Warmest Regards (retired)
Paper: Whisper White, Rose Red, Certainly Celery, Patterned Paper (from Michael's)
Ink: Rose Red, Pretty in Pink, Barely Banana, Certainly Celery
Accessories: Dimensionals, Sponge Dauber, Photo Corner Punch, Regal Rose 5/8 Grosgrain Ribbon, Blender Pen

4.75 x 4.75 card

Thanks for stopping by.

Friday, January 11, 2008

Mojo Monday on Friday

Just a quick post today. I feel a bit pressed for time. We have a busy weekend coming up. Every evening we have a social "outing", and I have to prepare some kind of food for each event. So I am taking a break from making the Mud Pie and procrastinating from preparing the veggie and fruit platters and doing something I want to do. Friday and Wednesday mornings, when I have the house to myself, it is all about me. *LOL *

Yesterday I had a bit of time to stamp. I needed a sketch to start from so I went to Poetic Artistry and looked up Julee Tilman's Mojo Monday Sketch Challenge. Here are a few details about the card:

* I distressed all the edges and then sponged them with a dauber in either Close to Cocoa or Not Quite Navy ink.

* The leaves are stamped in Brown Stazon right on the designer paper.

* To colour in the flower, I used a blender pen and an aquapainter. To make a more watery effect or lighter colour I used the aquapainter. For a bolder colour, I used the blender pen, keeping lots of ink on the tip so it wouldn't fade away.

Supplies:

Stamps: Time Well Spent, So Many Sayings
Paper: Naturals White, Whisper White, Not Quite Navy, Close to Cocoa, Bohemia Series Designer Paper (My Mind's Eye)
Ink: Close to Cocoa, Not Quite Navy, Whisper White Craft, Old Olive, Brown Stazon
Accessories: Distresser (Cutter Kit), Sponge Dauber, Antique Copper Brads (makingmemories), Dimensional, Blender Pen, AquaPainter

4.25 x 5.5 card

Well, that's all for now. Thanks for stopping by.

Wednesday, January 9, 2008

Cupcakes All In A Row


So, on Monday, when I was trying to "get inspired", one of the cards I looked at was by Natasha on Palmtrees and Pogosticks. I thought her cupcakes all in a row were very cute. So I had to try that too.

This is the second out of three cards I made on Monday.

Supplies:

Stamps: Cupcake (Studio G), It's Your Birthday, Everyday Flexible Phrases
Paper: Designer Paper (ki memories), Whisper White, Sage Shadow, Certainly Celery, Close to Cocoa
Ink: Black Stazon, Sage Shadow, Close to Cocoa, Certainly Celery
Accessories: Dimensionals, Round Tab Punch, Sponge Dauber, Sparkly Red Embossing Powder (Stampendous)

4.75 x 4.75 card

Thanks for stopping by.

Tuesday, January 8, 2008

A Birdie and House Thankyou


This is the first card that I made yesterday in my attempt to "get inspired". I used this cute card from Alli Miles as a template. You can also view her great blog HERE.

With this card, I wanted to make sure I used supplies that haven't been used for a while. I need to use up some of my "old" stuff before I buy some new stuff. (LOL) So, I got out my Cool Caribbean card stock and some Michael's ribbon that I've had sitting around for a while.

Supplies:

Stamps: Birdhouse, Bird & Thank You (Studio G Clear Stamps)
Paper: Whisper White, Cool Caribbean, Fuchsia (Michael's Card Stock Pack)
Ink: Black Stazon, Cool Caribbean, Aurora Pigment Ink (Color Box)
Accessories: Striped Ribbon (Michael's), Scalloped Square Punches (Marvy). Corner Rounder Punch

Thanks for stopping by. Oh, don't forget about the other two cards I made yesterday. Stay posted.

Monday, January 7, 2008

Finally Stamping in the New Year


I am finally back into the blogging world. I did check a few of my favourite blogs while out in BC, but I'm not computer savvy enough to post away from my own computer.

I spent today trying to get inspired. And to do that I looked up some of my favourite blogs for some card sketches. I made THREE cards. I just finished my third. The light right now isn't good enough to take a picture of them (since I usually set it up near my window in the afternoon,)so I will do that tomorrow and then make some posts with those cards.

While in BC I did a stamp class at my aunt's house. We spent the evening making five cards. This is one of the cards we made. I wanted something quick to keep things moving along. I thought is displays patterned paper nicely. The card base is cut to 7.5" x 5.5" in Pretty in Pink, scored at 4.25" which then folds into a regular 5.5" x 4.25 card.


In the second picture, you can see that I have a stip of patterned paper inside the card. I taped only the sides and bottom of the paper so that there is an opening at the top to place a gift card if you would like.

By the way, this card was CASEd from Atomicbutterfly on SCS. I love the cards she makes.

Recipe:

Stamps: Garden Silhouettes, Much Appreciated
Paper: Chocolate Chip, Pretty in Pink, Whisper White, Petals and Prints Designer Paper
Ink: Chocolate Chip, Pretty in Pink and Certainly Celery Markers
Accessories: 15/16" Chocolate Chip Satin Ribbon

Thanks for stopping by.