Tuesday, October 30, 2007

So VERY Saffron

Just a quick note today. Caleb has been sick with the flu since Saturday night. I think he is on the mend...so I have a couple of minutes to relax.

This is a card I made last week. I used the same layout as another card I've made (you can see it in a previous post). I liked it so much I had to make another two. :) On one card I used silver brads, while on the other I used some fancy brads I found at Dollarama.
Recipe:

Stamps: Fabulous Flowers, Holidays & Wishes
Paper: Very Vanilla, Close to Cocoa, So Saffron, So Saffron Designer Paper Series
Ink: Close to Cocoa, So Saffron
Accessories: Cream 5/8 Grosgrain Ribbon, Cutter Kit (distresser), Sponge Dauber, Silver Brads or Decorative Brads (Dollarama)

4.75 x 4.75 card

Saturday, October 27, 2007

Weekend Sketch Challenge #25


This is the card I made for Beate's Weekend Sketch Challenge. She also has the tutorial on how to make the "Z-Card" on her blog. It turned out to be easier then I expected.

A couple of things about this card:


Because I don't have markers in Old Olive and Chocolate Chip, I "rocked" the stamp in the ink I wanted. It is an acrylic stamp on a clear block so I could see what I was doing. I first did the bird in the Old Olive ink and then the branch in the Chocolate Chip ink. Finally I rocked the edges of the bird in the Chocolate Chip ink as well. By the way, the bird and branch image is one stamp, not two.

I sponged all the edges of the of the card stock and designer paper except for the base of the card. It was all sponged in Chocolate Chip except the Whisper White was sponged in Not Quite Navy.

As you can see in the second picture, I used the Scalloped Circle to close the card.


I really like this card and think I will make another one with all Stampin' Up! products so I can use it at a workshop.

Recipe:

Stamps: Nature Stamps (by Rhonna Farrer - Autumn Leaves), Everyday Flexible Phrases ("hope"), Warmest Regards ("Thinking of You")
Paper: Bohemia Line Designer Paper (My Mind's Eye), Old Olive, Chocolate Chip, Not Quite Navy, Whisper White
Ink: Chocolate Chip, Old Olive, Not Quite Navy
Accessories: Brads (makingmemories), Sponge Dauber, Scalloped Circle Punch, 1 3/8 Circle Punch, 1 1/4 Circle Punch

4.25 x 5.5 card

I will have another card to upload soon. So stay posted. :)

Tuesday, October 23, 2007

Take Two


OK, so I had another look at the Weekend Sketch Challenge and realized that I really deviated from it. So I did another card and followed it more closely. A quick and easy card.


Recipe:

Stamps: Enjoy (heidi swapp)
Paper: Very Vanilla, Close to Cocoa, Always Artichoke, K&Company DP, Olive Vellum (Michael's)
Ink: Close to Cocoa
Accessories: Olive Ribbon (Gale's Warehouse), Extra Large Pewter Eyelets, Sponge Dauber

4.24 x 5.5 card

Saturday, October 20, 2007

Weekend Sketch Challenge #24


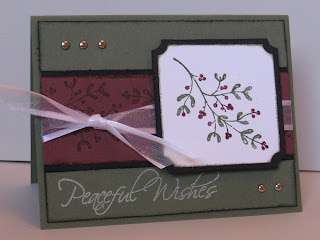
It actually took me two tries to come up with this card. They both look quite similar but there were certain things that I did not like about the first card I made. For example, with the first card the brads showed on the inside of the card. Didn't like that. I just added another layer of Always Artichoke card stock on top of the Always Artichoke card base. Also, the background looked so plain, so I stamped the mistletoe stamp in Bravo Burgundy on the Bravo Burgundy card stock. I like it so much better now. Oh, I als0 distressed the edges and then sponged them. I seem to be doing a lot of that lately.

By the way, I saw a similar card on a display at the Stampin' Up! booth at the Crop for Kids event last weekend. I am not sure who made this card, but I'll give credit to my "up-up-up-line", Joan, for designing this card. :)

Technique: Using a Marker to Colour on the Stamp

Actually the title is self-explanitory. It is quite simple to have your image stamped in a number of colours without using more than one stamp. All you need to do is use a pigment ink or water-based marker (I used Stampin' Up!'s, but you can also use Le Plume. I find them at Michael's in the scrapbooking section) and colour right on the stamp with your markers. Use as many colours as you like. Don't forget to breathe or "huff" on the stamp to re-moisten the ink. Finally, stamp on your card stock.

Recipe:

Stamps: Peaceful Wishes
Paper: Always Artichoke, Bravo Burgundy, Basic Black, Whisper White
Ink: Bravo Burgundy, Always Artichoke, Bravo Burgundy Marker, Always Artichoke Marker
Accessories: Silver Brads, White Ribbon (Gayle's Warehouse), Sponge Dauber

4.25 x 5.5 card


I made this card a couple of days ago for an upcoming stamp class. When I saw Beate's weekend sketch challenge I figured that I could use it for her challenge too. The only thing is that the horizontal strip goes all the way across on my card and the sketch doesn't show that. Hope that is OK. :)

Tuesday, October 16, 2007

Elegant Happy Harmony


I made this card last week sometime, but haven't had a chance to upload it. I have a few minutes to do this while the Thunder Cake is baking.

Zachary, Caleb and I read a book last night called "Thunder Cake" by Patricia Polacco. There is a recipe at the end of the book to make the same cake that the grandma and little girl make in the story. Zachary was all ready to make the cake last night, but we agreed to make it today during Caleb's nap. It calls for tomato soup.....that's interesting. We'll see how it turns out.

Technique:

Emboss Resist, Scalloped Edge (see previous posts for instructions)

Recipe

Stamps: Happy Harmony, It's Your Birthday
Paper: Whisper White, Elegant Eggplant, Certainly Celery, Almost Amethyst, Almost Amethyst Designer Paper Series
Ink: VersaMark, Almost Amethyst, Certainly Celery
Accessories: White Embossing Powder, Sponge, Corner Rounder Punch (to make scalloped edges), Ribbon (Michael's)

4.75 x 4.75 card

By the way, the cake is smelling wonderful. Instead of my daily piece of chocolate, I guess I'll have cake instead.

Friday, October 12, 2007

Weekend Sketch Challenge #23


This morning I checked out Beate's Weekend Sketch Challenge and figured I could do this one while the boys were at school. I had all the supplies from the card I made yesterday on my desk so I decided to use them again using this new layout. I made it pretty much the same way as yesterday's card.


Sage Shadow is not been one of my favourite colours. I've used it only one other time. The only reason I have this colour is because I once received a free package of card stock with my order from Stampin' Up! They must have thrown it in by accident. Since I had the card stock, I ordered the matching ink at another time. So when I found this design paper yesterday I saw that the Sage Shadow worked perfectly with it and was not overwhelming. I might have to go to Michael's and buy some more of this designer paper ;).


Recipe:

Stamps: Fabulous Flowers, It's Your Birthday
Paper: Very Vanilla, Close to Cocoa, Sage Shadow, Designer Paper (Sandylion)
Ink: Chocolate Chip, Sage Shadow
Accessories: Sponge Dauber, Cutter Kit (distresser), Blender Pen

4.75 x 4.75 card

Weekend Sketch Challenge #23 Once More


As I was adhering all my card stock together, I realized that there was not room for the jumbo eyelets that I wanted to add. So I just had to make another card..... This time the main image is on a 2.5 x 2.5 piece of Very Vanilla card stock.

The "recipe" is the same as the above post except I added Extra Large Pewter Eyelets by We R Memory Keepers.

Thursday, October 11, 2007

Two Challenges In One


Today I made this card using yesterday's Sketch Challenge and today's Ways to Use It Challenge on Splitcoaststampers. Since I didn't get around to doing the Sketch Challenge yesterday, I was "inspired" to combine it with today's challenge - to add some "bling" to the card. I thought, "Hey, I can do both".....that doesn't happen often for me.

Here's how I made this card: I stamped the large zinnia from the Fabulous Flowers set in Sage Shadow on a 3x3 piece of Very Vanilla card stock. Because I was using dye ink rather than pigment ink, I stamped over the flower using Versamark ink. Then I added the Iridescent Ice embossing powder and heated it with my heat gun. If I had pigment ink in the Sage Shadow, I would have skipped the VersaMark and just added the embossing powder. I also stamped one of the smaller flower from the same set in VersaMark on Sage Shadow card stock, then embossed it with the same EP.

I used a sponge dauber to ink the all the edges of the card stock in Chocolate Chip and then slightly distressed the same edges. I added two gemstones to the designer paper that has the stripes and one to the smaller flower (attached with a glue dot). I also attached two loops of ribbon behind the largest square of the main image. Finally I "glued" everything together. (So far the best adhesive I have used is a tape runner called Ad tech, bought at Walmart. If anyone uses something better, please let me know.)

After I took a good look at the card, I thought the bottom right hand corner was looking kind of "blank". I didn't have any stamps, with sentiments I wanted to use, that were small enough to fit in that corner. So I took the stamp that says, "Someone like you should be celebrated every day" from It's Your Birthday set and coloured "celebrate" with a blender pen inked up in Chocolate Chip. You may ask why I used a blender pen. Well....I don't have a marker in Chocolate Chip.....gasp.....can you believe it??? Hey, don't knock it. You can see proof that it worked!

I also uploaded a close up of the "bling" to give you a better idea of what it looks like.


So that is how this card evolved. Thanks for stopping by.

Recipe:

Stamps: Fabulous Flowers, It's Your Birthday
Paper: Sage Shadow, Very Vanilla, Close to Cocoa, My Mind's Eye Designer Paper, Sanylion Designer Paper
Ink: Sage Shadow, Chocolate Chip, VersaMark
Accessories: Chocolate Chip Ribbon, Sponge Daubers, Cutter Kit (distresser), Iridescent Ice Embossing Powder, Gemstone Brads (the Paper Studio), Glue Dot
4 3/4 x 4 3/4 card


Saturday, October 6, 2007

Weekend Sketch Challenge #22


So here is my version of Beate's Weekend Sketch Challenge. She has two samples posted and I immediately was inspired by the one that was more monochromatic. Click here to see her card using the Simply Said stamp set. I haven't used that set in a while so I decided to use it too. (Plus I love this set and not tired of it yet by any means.) So if you look closely and compare, there are a few changes. ;) In case it is hard to see on the photo, I sponged the edges of the card stock using Old Olive or Certainly Celery ink.


One thing to note: I have used my Coluzzle Cutting System a lot lately and find that it is so easy to use. I am quite happy with it....and it didn't cost much!!


Recipe:

Stamps: Simple Said, It's Your Birthday
Paper: Whisper White, Old Olive, Certainly Celery,
Ink: Old Olive, Certainly Celery
Accessories: Corner Rounder, Circle Coluzzle, Sponge Dauber, 1 3/8 Circle Punch, Scalloped Circle Punch, White Eyelets (makingmemories)

4 3/4 x 4 3/4 card

Weekend Sketch Challenge #22 in Almost Amethyst


After I completed the first card, I decided to do another one, but in Almost Amethyst and Elegant Eggplant. The other change I made was I used the largest two "circles" of the Circle Coluzzle Cutting Template to make the circle bigger. I also distressed some of the edges using the distresser of the Cutter Kit. Love that thing. Works waaay better than my nails!!

Wednesday, October 3, 2007

Hip Hip Hooray for Bellas!


Yesterday on the Splitcoaststampers, I saw that the Colour Challenge was Chocolate Chip, Blue Bayou and River Rock. The only colour that I have is Chocolate Chip. Unfortunately I can't buy everything.....you can't eat card stock ;) So I decided to improvise and use colours that I thought were fairly close in hue - Not Quite Navy and Sahara Sand. And I think these colours work well together. I even found some designer paper that had those colours in it. This was a very quick card to make. By the way, I tried to take a close up of the gemstones on the flowers and dotted "i's" of the sentiment.


Well, I'm off to check out the Sketch Challenge on Splitcoaststampers.


Recipe:

Stamps: Flowahbella, Sentiment (from Michael's $1.50 bin)
Paper: Designer Paper (Bohemian line from My Mind's Eye), Sahara Sand, Naturals White, Not Quite Navy, Chocolate Chip
Ink: Chocolate Chip, Not Quite Navy, Sahara Sand, Ruby Red
Accessories: Ticket Corner Punch, 1 3/8 Circle Punch, Scalloped Circle Punch, Sponge Dauber, Blender Pen, Chocolate Chip Grosgrain Ribbon, Gemstones (the Paper Studio)

4 1/4 x 5 1/2 card

Holiday Glitz Promo

Starts October 1 until supplies run out!

You can take advantage of this kit in two fantastic ways:

1) Purchase one of the following holiday stamp sets below and get the Holiday Glitz card kit (110286) for the special price of $34.95
2) Purchase the Holiday glitz card kit for $39.95 each with no additional purchase required.

Each Holiday Glitz card kit makes 15 cards and includes:

* Precut card stock and Designer Paper Series (15)
* Whisper White Envelopes (15)
* Rhinestone Brads (15)
* Real Red Zigzag Ribbon (15)
* Full-colour instruction sheet (1)

STAMP SETS & PRICE:

$32.95 Snowfall
$28.95 The Snowflake Spot
$28.95 Flacons piquetis
$25.95 Big on Christmas
$32.95 Love & Joy (in the Holiday Mini Catalogue)

Stamp sets can be viewed in the catalogues online at http://www.stampinup.com/.

To make an order, please email me before supplies run out. You can find my email address in "my complete profile".