Wednesday, May 25, 2011

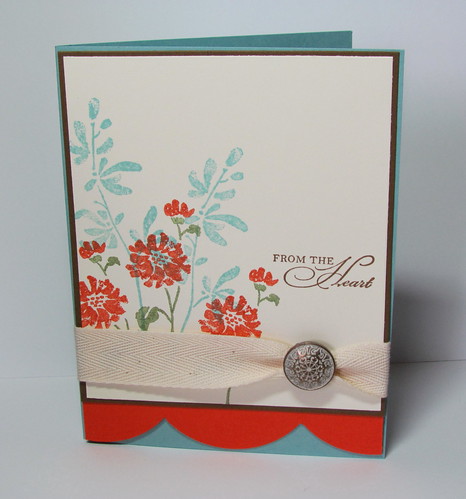
From the Heart

From the Heart by Andrea G71

 I pulled out an old favourite for this card - the retired Watercolour Trio stamp set.  This is one of those sets that I will never get rid of.   I also pulled out some twill tape that has been sitting around forever.  I don't use it very often but I should since it is so nice to work with.

Supplies:

Stamps:  Watercolor Trio
Paper:  Baja Breeze, Tangerine Tango, Soft Suede, Very Vanilla
Ink:  Baja Breeze ink, Soft Suede ink, Tangerine Tango and Pear Pizzaz Markers
Accessories:  Vintage Brads, Twill, Embossed Curve Border Punch (non-SU), 

Thanks for stopping by.

Saturday, May 21, 2011

Masked Every Moment

Masked Every Moment by Andrea G71


Another card we made at our May Stamp Club workshop.

Directions:

Stamp image with Black Stazon ink in bottom corner of Whisper White card stock.  Make sure you leave enough room for the eyelet.

Create a mask for your image on a Post-It note and cut out.  Place on top of stamped image.  Here is a great TUTORIAL on masking.  Instead of stamping another image, we sponged around our mask with Bashful Blue ink.  

You will need to create a Template that fits over the 3-1/2 x 4-3/4 Whisper White card stock.  The open rectangle measures at 2 x 2-7/8 but you can make it as big or small as you want.

Use a yellow sponge, not sponge dauber, to pick up Bashful Blue ink and "pounce" over image.  Around edges I also rub in a circular motion to get a more smooth and even effect.

 Colouring with Water Colour Crayons:

To colour the image I used the Neutrals and Brights Water Colour Crayons.  On the larger parts, like the yellow part of the bird, I coloured directly on the image with the crayon.  For the narrow areas, Olive, Black and Pumpkin Pie areas, I picked up colour from the crayon with my blender pen.  The bull rushes were coloured with Crumb Cake and then shaded in with Early Espresso.  Here is a TUTORIAL if you would like to see photos of how it is done.  This tutorial uses an Aquapainter instead of a blender pen.  Both work.

I used the Crop-o-dile to add the eyelets but you can use whatever eyelet setter you feel comfortable with.  I set the eyelets through the Whisper White and Bashful Blue card stock.  Then add the linen thread. 

Dimensions:

Whisper White:  A2 Card Base;  3-1/2 x 4-3/4
Crumb Cake:  5-3/8 x 4-1/8
Bashful Blue:  3-5/8 x 4-7/8

Supplies:

Stamps:  Every Moment
Paper:  Whisper White, Crumb Cake, Bashful Blue, 
Ink:  Black Stazon, Bashful Blue
Accessories:  Cardboard Template for Masked Rectangle, Edge Distresser, Dimensionals, Post-It Note for Image Mask, Neutral Eyelets, Linen Thread, Crop-o-dile, Watercolour Crayons (Neutrals and Brights), Blender Pen, Sponge

Thanks for stopping by.

Edited on June 15, 2011.  Today someone left a anonymous comment saying that I made a "direct copy" of THIS  card, I think,(after searching the site) on Splitcoaststampers.  Unfortunately I don't remember where I got inspiration to make this card since I made it a few months ago and only posted it now.  It looks like I must have since I do see similarities although to me it doesn't look like a direct copy.  I often look at a few cards when I am trying to figure how I might use a particular stamp set.  I guess I am going to have to keep track of all the cards I use as inspiration.  My apologies.

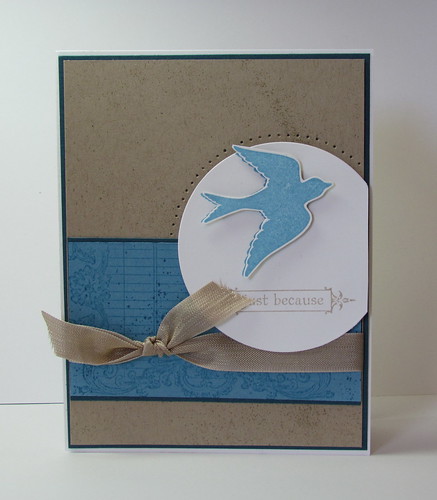
Notably Ornate

Notably Ornate by Andrea G71

Up here in Canada we are having the "May Long".  Hope you are having a good one.  We are having a bit of rainy weather - after a gorgeous week.  Oh well.  But that means I can finally get this post done!

This is one of the cards we made at our May Stamp Club workshop.  We used two techniques on this card:  the Colour Spritzer and using the Mat Pack to Pierce a Curved Border.

Directions:

Colour Spritzer - We used Marina Mist and Crumb Cake Markers with the Colour Spritzer.  The markers were spritzed on their matching card stock.   The spritzer gives a subtle effect to the card stock.  I found that you need to make sure you put the nib of the marker directly against the part of the spritzer where the air comes out.  Angle the spritzer until you find the desired position until you like how the spray is coming out.  You might have to play around a bit.

Paper Piercing a Curved Border - I used the instructions on THIS TUTORIAL.  First I made a template out of thin cardboard of the same size circle.  I wanted to make sure my circle image stayed clean and wouldn't get smudged or bent.  Then I followed the above instructions.

I think everything else is self-explanatory by looking at the photo.  :)

Dimensions:

Whisper White:  A2 Card Base size;  2-3/4" circle;  scrap for bird
Not Quite Navy:  5-3/8 x 4-1/8;  2-1/4 x 4
Kraft:  5-1/4 x 4;  
Marina Mist:  2-1/8 x 4

Supplies:

Stamps:  Notably Ornate
Paper:  Whisper White, Not Quite Navy, Crumb Cake, Marina Mist
Ink:  Marina Mist, Crumb Cake, Marina Mist and Crumb Cake Markers
Accessories:  Paper Piercer, Mat Pack, Dimensionals, Crumb Cake Seam Binding Ribbon, Colour Spritzer

Thanks for stopping by.

Friday, May 13, 2011

Nature Thoughts


Nature Thoughts by Andrea G71

I had some pre-cut card stock lying around that was used for a stamp class and I didn't want to make the same card.  So I came up with something else.  As you can see I used the Presto Patterns DSP which is already "embossed" for you.  All I did was sponge on some Crumb Cake, Soft Suede and Certainly Celery ink on it. TIP:  I find that by rubbing the sponge in a circular motion brings out the "embossed" image more than just dabbing or pouncing the sponge on the paper.

Supplies:

Stamps:  Nature Walk, Word Play
Paper:  Presto Patterns DSP, Soft Suede, Whisper White, Certainly Celery
Ink:  Soft Sued, Crumb Cake, Certainly Celery
Accessories:  Sponge, Dimensionals

Thanks for stopping by.

Wednesday, May 11, 2011

Sweet Stitches Buttons

FTL132 with Sweet Stitches Buttons by Andrea G71


Here is another card using the Fall to Layout from the Clean and Simple Blog.  I guess I couldn't get enough of this layout.  Don't worry though, this is the last card using this layout.  LOL .  If you do want to see the other cards I made using this layout you can view them HERE.

Supplies:

Stamps:  Apple Blossoms (hostess set), Teeny  Tiny Wishes
Paper:  Whisper White, Melon Mambo, Old Olive DSP
Ink:  Old Olive,
Accessories:  Sweet Stitches Buttons (retired), Melon Mambo Pompom Trim, Tombo White Liquid Glue, Glue Dots

4.25 x 5.5 card

Thanks for stopping by.

Wednesday, May 4, 2011

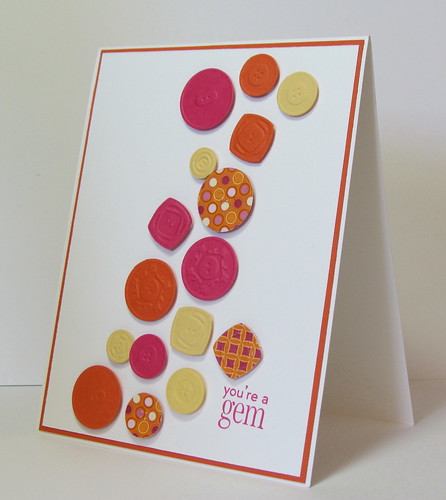
Sweet Buttons


Sweet Buttons by Andrea G71 

Today I don't have a lot to say about this card.   Just that it was very quick and easy to make.  You may have noticed that I used the same colour family as the cards in THIS post.

Supplies:

Stamps:  You're a Gem (Mini Catalogue)
Paper:  Whisper White, Tangerine Tango, Melon Mambo, So Saffron, Sweet and Sour DSP
Ink:  Melon Mamob
Accessories:  Sweet Buttons Sizzlet, Big Shot, Dimensionals

Thanks for stopping by.

Monday, May 2, 2011

April Stamp Club: Part 2

Brayered Vintage Wallpaper

I was looking around Splitcoaststampers and saw THIS note bag which inspired the card we made at our Stamp Club workshop in April.  I thought brayering over the debossed side of the card stock was a neat idea and really like the effect.

Brayer on Debossed Card Stock:

Run the Early Espresso card stock in Vintage Wallpaper Embossing Folder through the Big Shot.  Lay the card stock down, making sure the embossed image is indented. Ink up brayer in Early Espresso ink and roll over card stock until ink is even over the entire piece of card stock.  The debossed image, or indented parts, will not have any ink on them so they will appear lighter in colour. 

Use the Early Espresso and Tangerine Tango markers to colour the words on the Word Play stamp.  Huff on stamp before stamping on card stock.

Run one Tangerine Tango flower through the Big Shot in the Vintage Wallpaper Embossing Folder.  Sponge all edges of flowers, punched out leaves and card stock with sentiment.  You can add a score line to the center of the leaves if you wish.

Use a paper piercer to add a brad to the center of the flowers.

Adhere layers of card stock and flowers.  Use a two-way glue pen to glue the thin strip of tangerine tango card stock to the card.  Pop of the flower with a dimensional.

Dimensions:

Very Vanilla:  5-1/2 x 8-1/2;  1-3/8 x 3-3/8
Tangerine Tango:  3-7/8 x 5-1/8;  3/8 strip for scalloped border;  1/8 x 3/8:  squares for two flowers
Old Olive:  scraps for oval leaves
First Edition DSP:  square for large flower
Early Espresso:  3-3/4 x 5

Supplies:
Stamps:  Word Play
Paper:  Very Vanilla, Tangerine Tango, Early Espresso, Old Olive, First Edition DSP
Ink:  Early Espresso, Early Espresso and Tanerine Tango Markers
Accessories:  Big Shot, Vintage Wallpaper Embossing Folder, Large Oval Punch, Fun Flowers Bigz Die, Sponge Dauber, Brad, Dimensionals, Dotted Scallop Ribbon Border Punch, Brayer, Two-Way Glue Pen, Scor-Pal

4.25 x 5.5 card

Thanks for stopping by.

April Stamp Club: Part 1


Here Comes Spring With a Little Pompom Trim


This is one of the cards we made for our April Stamp Club workshop.  Finally found some time to post the cards.  Sorry for the wait. 

For this card there were options depending on what people wanted their card to look like.  Using the same layout and supplies, you could either stamp directly on the Whisper White background OR after stamping, you could stamp the same flowers on Whisper White scraps, cut out and then pop up with dimensionals.

Just a note about adhering the pompom trim:  Add a line of glue on top of the card stock where you want to place the trim.  Add the trim on top of the line of glue and press down gently.  Trim edges of pompom that extend over the edges of the card.

Dimensions: 

Whisper White:  4-1/4 x 11;  4 x 5-1/4;  scraps
Melon Mambo or Tangerine Tango:  4-1/8 x 5-3/8
Old Olive DSP:  4 x 1-1/4

Supplies:

Stamps:  Apple Blossoms, Teeny Tiny Wishes
Paper:  Whisper White, Melon Mambo, Brights Patters DSP Stack
Ink:  Tangerine Tango, Melon Mambo, So Saffron, Old Olive
Accessories:  Melon Mambo Pompom Trim, Sweet Buttons Sizzlet, Big Shot, Tombo White Liquid Glue

4.25 x 5.5 card


Supplies:

Stamps:  For All You Do, Teeny Tiny Wishes
Paper:  Whisper White, Tangerine Tango, Brights Patterns DSP Stack
Ink:  Tangerine Tango, Melon Mambo, So Saffron, Old Olive
Accessories:  Melon Mambo Pompom Trim, Dimensionals, Corner Rounder Punch, Big Shot, Sweet Buttons Sizzlet, Tombo White Liquid Glue

4.25 x 5.5 card

By the way, for these layouts I used the Fall to Layout 132 from the Clean and Simple Blog.

Thanks for stopping by.