
Hi. I am still on holidays in BC. Having a great time with family. But we got snow here, can you believe it. I thought we left that behind. Oh, well.
I will be back in January, so I will make a post then. Thanks for looking.
By the way, have you noticed the comments from Adam Brown in the previous post? He seems to think that I've contacted him about some abs diet. I haven't decided on a New Years Resolution yetso maybe working on my abs should be it??? Very funny.
Have a happy new year!
Andrea
Saturday, December 29, 2007
Friday, December 21, 2007
Time Well Spent - Again

Today is the last day of school for Zachary. Hurray! I didn't think I would be looking forward to school ending so much, because I kind of like the routine. But we are going to BC for Christmas and everyone is excited about that. Even though the forecast calls for rain. Keep your fingers crossed that it will let up for a bit and the boys can play outside. They are looking forward to playing some street hockey in my parents' cul de sac.
Here is the second card I promised I'd show you using the Time Well Spent set. I was quite generous when I used the two-way glue pen and really squeezed out a lot of glue. More generous than usual. I'm glad I did, because it is more sparkly than usual - more glitter stuck on. The one thing I wish I would have done differently was to emboss the word "sparkle". It would have stood out more. Oh well, next time.
Supplies:
Stamps: Time Well Spent
Paper: Mellow Moss, Naturals Ivory, Chocolate Chip, My Mind's Eye Designer Paper
Ink: Chocolate Chip, Mellow Moss, Cool Caribbean, Bordering Blue, Certainly Celery
Accessories: Corner Rounder Punch, Sponge Dauber, Dimensionals, Crystal Brads (making memories), 1/16" Hand Held Circle Punch, Circle Coluzzle, Two-way Glue Pen, Dazzling Diamonds Glitter
4.75 x 4.75 card
Thanks for stopping by.
Thursday, December 20, 2007
Friends
 The layout for this card is cased from Alli Miles'. Can you tell that I really like the cards she makes?? It didn't take me that long to make. I started it while the boys were watching "Fetch! with Ruff Ruffman". (Their new favorite show. Or I should say Zachary's. Caleb often falls asleep.) And I finished it while the quiche was baking in the oven.
Here is a close up of where I put the Crystal Effects. I haven't used that in a while. Do you find that the spout, or whatever that thing is called where the glue comes out of, always plugs up? I use a needle or my paper piercer to unplug it? The hole just seems to get bigger. Do you have any solutions? I'd love to know what to do about it.

Supplies:
Stamps: Time Well Spent
Paper: Mellow Moss, Naturals Ivory, Chocolate Chip, DP (My Mind's Eye)
Ink: Mellow Moss, Certainly Celery, Bordering Blue, Chocolate Chip, Cool Caribbean, Chocolate Chip Marker
Accessories: Antique Copper Brads, Corner Rounder Punch, Circle Coluzzle, Blender Pen, Aqua Painter, Hand Held 1/16 Circle Punch, Dimensionals, Crystal Effects
4.75 x 4.75 card
I made another card using the same layout and colours, but I'll show you that one tomorrow.
Thanks for stopping by.
Monday, December 17, 2007
Check out Alli Miles' blog!!!
One of the blogs I read on a daily basis is Card Metaphors by Alli Miles. She has a great blog with many wonderful cards. I always get lots of ideas from it. Just click HERE and check out her blog.
Well, I was checking out my daily dose of blogs and when I went to Alli's I saw that my card was on it!!! My stomach got all butterfly-ee (new word??)because I was so excited and even a little nervous. This is the first time one of my creations ended up on another blog. A while back, I had sent Alli a thank you card for sending me a bunch of her wonderful scraps of designer paper. I had been so excited to win some of her "blog candy". And now this. Thanks Alli.
If you would like to see my card on her blog, just click HERE. It is a card that I have posted earlier. But isn't neat seeing your stuff somewhere else too?
Thanks for stopping by.
Wednesday, December 12, 2007
Last Friday's Fun

So last Friday, Natasha from Palmtrees and Pogosticks had an Inspiration Challenge, "Tasher's Friday Fun". This is the first time I've ever done an Inspiration Challenge. I ended up doing one card on Sunday, not loving it entirely, making another card on Monday, liking it a bit better, and finally posting the second card today. If you want to see my first card, I have it posted in my Splitcoaststampers gallery.
Well, I'm off to finishing my Christmas cards, start wrapping a few gifts and hopefully finish making the chocolate truffles. The boys are at school, so I have the house to myself. Better get crackin'.
Recipe:
Stamps: Garden Silhouettes, Hugs and Wishes, Canvas BG
Paper: Chocolate Chip, Old Olive, Close to Cocoa, Very Vanilla, Crate Designer Paper
Ink: Very Vanilla, Close to Cocoa, Chocolate Chip
Accessories: 15/16" Satin Chocolate Chip Ribbon, Giga Scalloped Punch (Marvy), Mega Circle Punch (Marvy), Dimensionals
4.47 x 4.75 card
Friday, December 7, 2007
For a Wedding

I made this card for my husband's co-worker who got married last Saturday. I was planning on going to the wedding. In fact I had just started getting ready and Zachary yelled from the living room, "Caleb threw up!". Just great. Well, Byron ended up going to the wedding alone and I stayed at home helping my youngest aim for the pail. That's four bouts of the flu in one month. Could you say that we are done for the year!!??
Anyway, here is the card.
I don't have a Cuttlebug, so what I've done is used the Embossed Box of Cards from Michaels and trimmed the embossed part to whatever size I want. They are just plain white cards and I was finding that I wasn't using them at all. I think I will use them more this way and I can choose whatever colour I want for a card base.
I pulled out last year's SAB set, Delight in Life, which I have never used before. I thought it looked kind of weddingish. The sentiment is also last year's SAB set, Happy Harmony. I guess it is better late than never to use something. I used aquapainters to colour in the flowers. I thought some of it turned out too dark and uneven. When I was using them, I definitely used too much water. I had to let them dry. I guess I need some more practice. By the way, I stamped the same flower in Mellow Moss and cut out the petals to use for the leaves.
Well, gotta run. I am making some card sets as Christmas presents for friends.
Supplies:
Stamps: Delight in Life, Happy Harmony
Paper: Embossed Box of Cards (DCWV), Elegant Eggplant, Pale Plum
Ink: Elegant Eggplant, Mellow Moss. Pale Plum, So Saffron
Accessories: Oval Scalloped Punch (Marvy), Plum Satin Ribbon (Gale's), Oval Coluzzle, Blender Pens, Aquapainter, Dimesionals. Sponge Dauber
5.5 x 5.5 card
Thursday, November 29, 2007
Colour Challenge #142

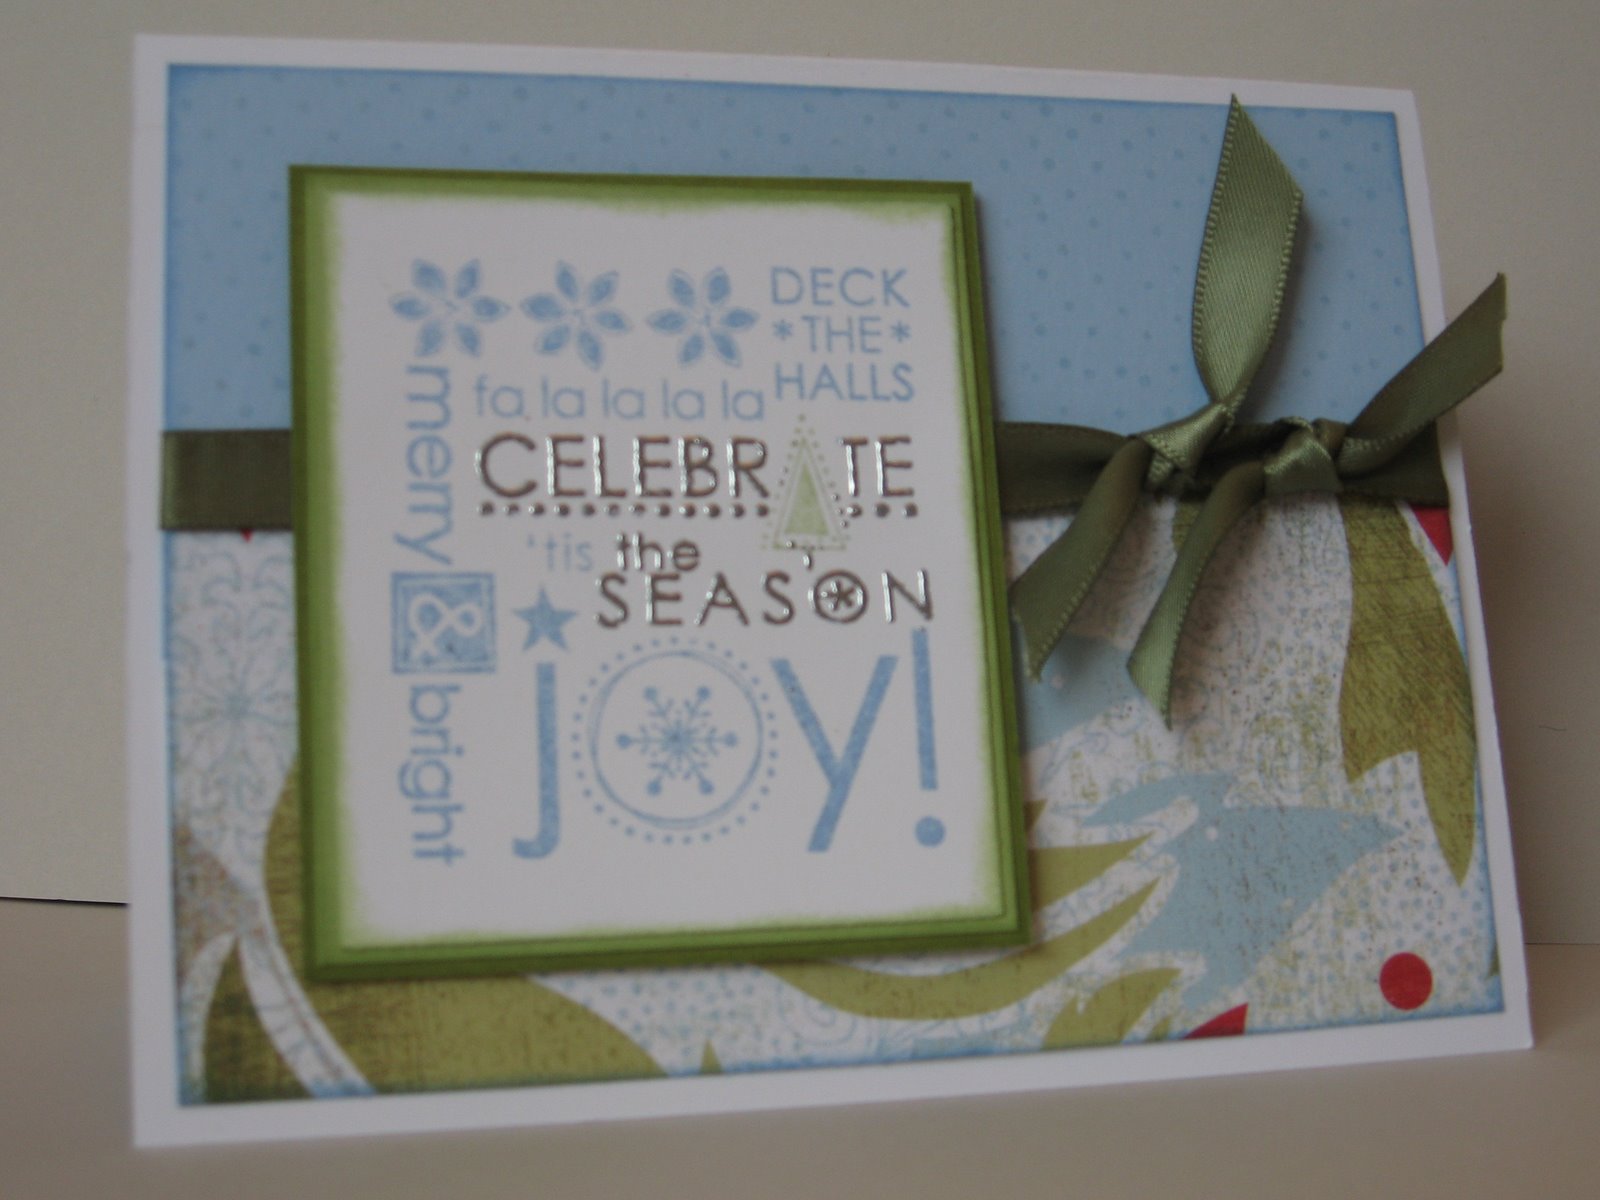
This past Tuesday, I took a look at what the colour challenge was on Splitcoaststampers. I finally completed the cards last night. Yes, I made two using the Season of Joy stamp set. When I was stamping the main image panel, I decided to do two right away just in case I made a mistake and had to trash the one. Takes less time in the end - for me anyways. But it worked out and I was able to get two cards out of it.
So, the colour challenge was bashful blue, certainly celery and basic grey. I don't have the grey, so I used silver card stock instead. I love these colours together. And I really like the samples that used the basic grey. Maybe have to get some of that card stock in the new year.
On this first card, I first inked the main image stamp in Bashful Blue and then wiped the ink off the words "CELEBRATE the SEASON" with my finger. Yeah, I know, very professional. But hey, you gotta do whatever works for you. I then used my Versamarker and coloured the same words with it and the Christmas tree with a Certainly Celery marker. I embossed it with silver embossing powder. Finally, I inked the edges with Bashful Blue ink and dauber, then layered onto Silver and Bashful Blue card stock.
On the Certainly Celery card stock, I stamped the "swirl" in Certainly Celery ink, added three rhinestone brads and tied a ribbon around it. Oh, I also sponged the edges with Celery ink. I taped all the pieces together and used dimesionals behind the main image.
Supplies:
Stamps: Season of Joy
Paper: Whisper White, Certainly Celery, Bashful Blue, Brushed Silver
Ink: Certainly Celery, Bashful Blue, Versamarker, Certainly Celery Marker
Accessories: Ribbon (Michael's), Silver Embossing Powder, Gemstone Brads (the Paper Studio), Dimensionals, Sponge Daubers
4.25 x 5.5 card
On this second card I used Designer Paper that I received from Alli Miles last week. I noticed that it had the challenge colours in it. Sorry, I don't know which company the dp comes from. On the Bashful Blue card stock, I used one of the Itty Bitty Background stamps with Versamark ink. I also used Olive Satin Ribbon. I made the main image in the same way as the previous card, although sponged with celery ink and added an Olive layer behind the Silver card stock. This card came together very quickly.

Supplies:
Stamps: Season of Joy, Itty Bitty Backgrounds
Paper: Whisper White, Bashful Blue, Certainly Celery, Old Olive, Brushed Silver, Designer Paper (unknown)
Ink: Bashful Blue, Certainly Celery, Versamarker, Versamark, Celery Marker
Accessories: Sponge Daubers, Olive Satin Ribbon (Gale's), Silver Embossing Powder, Dimensionals
4.25 x 5.5 card
So, the colour challenge was bashful blue, certainly celery and basic grey. I don't have the grey, so I used silver card stock instead. I love these colours together. And I really like the samples that used the basic grey. Maybe have to get some of that card stock in the new year.
On this first card, I first inked the main image stamp in Bashful Blue and then wiped the ink off the words "CELEBRATE the SEASON" with my finger. Yeah, I know, very professional. But hey, you gotta do whatever works for you. I then used my Versamarker and coloured the same words with it and the Christmas tree with a Certainly Celery marker. I embossed it with silver embossing powder. Finally, I inked the edges with Bashful Blue ink and dauber, then layered onto Silver and Bashful Blue card stock.
On the Certainly Celery card stock, I stamped the "swirl" in Certainly Celery ink, added three rhinestone brads and tied a ribbon around it. Oh, I also sponged the edges with Celery ink. I taped all the pieces together and used dimesionals behind the main image.
Supplies:
Stamps: Season of Joy
Paper: Whisper White, Certainly Celery, Bashful Blue, Brushed Silver
Ink: Certainly Celery, Bashful Blue, Versamarker, Certainly Celery Marker
Accessories: Ribbon (Michael's), Silver Embossing Powder, Gemstone Brads (the Paper Studio), Dimensionals, Sponge Daubers
4.25 x 5.5 card
On this second card I used Designer Paper that I received from Alli Miles last week. I noticed that it had the challenge colours in it. Sorry, I don't know which company the dp comes from. On the Bashful Blue card stock, I used one of the Itty Bitty Background stamps with Versamark ink. I also used Olive Satin Ribbon. I made the main image in the same way as the previous card, although sponged with celery ink and added an Olive layer behind the Silver card stock. This card came together very quickly.
Supplies:
Stamps: Season of Joy, Itty Bitty Backgrounds
Paper: Whisper White, Bashful Blue, Certainly Celery, Old Olive, Brushed Silver, Designer Paper (unknown)
Ink: Bashful Blue, Certainly Celery, Versamarker, Versamark, Celery Marker
Accessories: Sponge Daubers, Olive Satin Ribbon (Gale's), Silver Embossing Powder, Dimensionals
4.25 x 5.5 card
Well, that's all for now. I'm off to arrange a play date for Zachary tomorrow. There is no school again tomorrow. My third Friday this month where my "alone" time has been "taken away". Oh, well.
Sunday, November 25, 2007
Time Well Spent

On Friday I received a free stamp set, Time Well Spent, from Stampin' Up! This set is a Level Three Hostess Set from the new catalogue coming out in January. When I first saw this set I was not that excited about it. But when I started playing around with it I realized that there are quite a lot of possibilities. So yesterday I inked it up and this is what I came up with.
Here are the dimensions along with the supplies I used to make this card. (I usually don't record the dimensions, but I think I might want to make this card again. I sent it off to someone already so I don't have the original.)
5.5"x 4.25" - Card base in Old Olive
5.25"x 4" - Celery Designer Series Paper. I inked the edges with Old Olive ink.
4.25"x 3.25" - Certainly Celery. Edges are inked in Old Olive.
4" x 4" - Whisper White. Edges are inked in Certainly Celery.
.75"x 3" - Pretty in Pink strip. Stamped with smallest flower of set in Pretty in Pink ink. Edges are also inked lightly in Old Olive.
I used a blender pen to colour in the outlined/smaller portions of the large flower. For the large area in the middle of the flower I used an aqua painter. This is the first time I have used it. Wow! I love it. It gives such a nice water colour quality. I know I need some practice but I liked how it turned out for my first try. It is very subtle. I'm ready to try it again.
Supplies:
Stamps: Time Well Spent
Paper: Old Olive, Certainly Celery, Celery Designer Series Paper, Whisper White, Pretty in Pink
Ink: Old Olive, Black Stazon, Certainly Celery, Pretty in Pink
Accessories: Olive Satin Ribbon, Sponge Dauber, Celery Brad, 1/16 Hand Held Punch, Dimensional, 3/4" Circle Punch
Thursday, November 22, 2007
I won??!!??
Last week when I went on Alli Miles blog, Card Metaphors, she had a post saying that the first two people who email her will be mailed some of her designer paper. Well, since her blog is one of the first blogs I check in the morning, around 7am, I noticed I was the second person to post a comment. And later that day I got an email saying that I would receive some of her designer paper. Yippee!! Yesterday I got the package in the mail. There are some beautiful pieces of designer paper in the envelope. I mostly get my paper from Michael's or Stampin' Up! because it is so convenient. After seeing this paper, I realized that I need to make the effort to go to the local scrapbooking stores.
This is the card I made as a Thank you to her. The horizontal strip of designer paper is a piece from the stash she sent me. Thanks, Alli. (The Rose Red scalloped circle is actually a perfect match to the dark pink in the patterned paper. I tried a number of pictures to try to get the colour to match, but it didn't work out.)

Recipe:
Stamps: Bird from Nature Stamps by Rhonda Farrer (Autumn Leaves), Much Appreciated (SU)
Paper: Designer Paper (unknown from Alli Miles), Green Scroll (NRN Designs), Whisper White, Rose Red,
Ink: Timber Brown Stazon, Old Olive, So Saffron Marker
Accessories: Sponge Dauber, Two-way Glue Pen, Dazzling Diamonds Glitter, Olive Satin Ribbon, Giga & Mega Marvy Scalloped Circle Punches, Gemstones (the Paper Studio & Darico)
4.75 x 4.75 card
Tuesday, November 20, 2007
Happiness Always

Fargo was so much fun!! Ang and I have decided that we are going to go again next year. I guess I had better start saving my money now! LOL. I have a secret.....We shopped for ten hours on Saturday.....Crazy!!! And sooo much fun!!!
I had a bit of time to stamp today. Here's the card:
Recipe:
Stamps: Happy Harmony, Itty Bitty Backgrounds
Paper: Chocolate Chip, Naturals White, Boho Chic Funky Fix from the Urban Window Series Designer Paper (We R Memory Keepers)
Ink: Chocolate Chip, Old Olive
Accessories: Sponge Dauber, Brad, Prima Flower, Corner Rounder Punch, Scalloped Scissors, Olive Organdy Ribbon, Oval Coluzzle
4.25 x 5.5 card
Thursday, November 15, 2007
Another Stamp Class Card

This is another card I have done in a number of stamp classes. This card uses acetate (or transparencies). I've done it two different ways. In the card shown, I stamped French Script in Close to Cocoa on the strip of Very Vanilla card stock. I then stamped the flower in Brown Stazon on the acetate, flipped it over and used blender pens to colour in the flower. I flipped it back over and very carefully and precisely placed the acetate on the Very Vanilla card stock and held it steady while I punched in a hole and placed a brad. The ink comes off the acetate so I wanted to make sure it came off in the exact place I wanted it - directly behind the outline of the flowers. Kind of tricky. So for another stamp class, I did the opposite: Stamped the flower and coloured in with blender pens on the card stock, and stamped the French Script in Stazon on the acetate. Much easier. Both work, but the look is a bit different. Sorry, I don't have a picture to show you of the second card.
I've done this card in three stamp classes/worshops. And I've noticed that everyone has different tastes. Some people like the photo corners on the card, and others don't and just use four brads instead. Interesting.
Recipe:
Stamps: Oh, So Lovely, French Script Background, Warmest Regards, Rough Edges Wheel
Paper: Very Vanilla, Chocolate Chip, Sage Shadow, Perfect Plum, Acetate
Ink: Close to Cocoa, Chocolate Chip, Timber Brown Stazon
Accessories: Antique Copper Brads (makingmemories), Photo Corner Punch, Dimensional, Hand Held 1/16" Punch
4.25 x 5.5 card
Well, I am off to Fargo, ND this weekend with my friend Ang to do some Christmas shopping and have some fun and relaxation. Actually, shopping is fun and relaxing for me! LOL. I am looking forward to it very much....lots of fun and hopefully some good deals. :) I hope to get ALL my Christmas shopping done.
Wednesday, November 14, 2007
Belated Weekend Sketch Challenge #27

I finally got around to the Weekend Sketch Challenge this last Tuesday. And I didn't have a chance to up load the card. Better late than never.
Recipe:
Stamps: Happy Harmony, Looks Like Spring, In the Spotlight
Paper: Bohemia Series Designer Paper (My Mind's Eye), Vellum Dots Designer Paper (Paper Pizazz),Whisper White, Close to Cocoa, White Vellum Card Stock
Ink: Close to Cocoa, Whisper White
Accessories: White Ribbon (Michael's), Crystal Brads (makingmemories), Circle Coluzzle, Glue Dots, Cutter Kit (distresser), Ticket Corner Punch
4.75 x 4.75 card
Sunday, November 11, 2007
It's Been A Long Time....
 ...since I last made a post. These last two weeks have been crazy. Along with the regular activities of life, the last two weeks have been filled with two bouts of the flu and a couple of stamp classes. So tonight I am going to make a short post before I continue preparing for the next stamp class. Three more in November. It's been fun so far.
This is one of the cards that has been made at the stamp classes. I know I got the idea from someone on Splitcoaststampers, but I just don't know who it was. I've been through my entire "Favorites" but can't find the card there. So sorry I can't give the person credit for my "inspiration".
It is a simple card to make and looking at the supplies in the "recipe" it is fairly self-explanitory. If not, I'd be happy to answer any questions.
Recipe:
Stamps: Paisley Background, Simply Said, Warm Words
Paper: Whisper White, Certainly Celery, So Saffron,
Ink: Craft Whisper White, Sahara Sand, Certainly Celery, Markers in Pretty in Pink, So Saffron & Certainly Celery,
Accessories: Sponge Dauber, Two-Way Glue Pen, Dazzling Diamons Glitter, Certainly Celery Grosgrain Ribbon
4.74 x 5.5 card
OK, it's back to more cutting card stock. I hope to post again this week. Keep your fingers crossed that no one else will get the flu.
Tuesday, October 30, 2007
So VERY Saffron

Just a quick note today. Caleb has been sick with the flu since Saturday night. I think he is on the mend...so I have a couple of minutes to relax.
This is a card I made last week. I used the same layout as another card I've made (you can see it in a previous post). I liked it so much I had to make another two. :) On one card I used silver brads, while on the other I used some fancy brads I found at Dollarama.
This is a card I made last week. I used the same layout as another card I've made (you can see it in a previous post). I liked it so much I had to make another two. :) On one card I used silver brads, while on the other I used some fancy brads I found at Dollarama.

Recipe:
Stamps: Fabulous Flowers, Holidays & Wishes
Stamps: Fabulous Flowers, Holidays & Wishes
Paper: Very Vanilla, Close to Cocoa, So Saffron, So Saffron Designer Paper Series
Ink: Close to Cocoa, So Saffron
Accessories: Cream 5/8 Grosgrain Ribbon, Cutter Kit (distresser), Sponge Dauber, Silver Brads or Decorative Brads (Dollarama)
4.75 x 4.75 card
Saturday, October 27, 2007
Weekend Sketch Challenge #25

This is the card I made for Beate's Weekend Sketch Challenge. She also has the tutorial on how to make the "Z-Card" on her blog. It turned out to be easier then I expected.

A couple of things about this card:
Because I don't have markers in Old Olive and Chocolate Chip, I "rocked" the stamp in the ink I wanted. It is an acrylic stamp on a clear block so I could see what I was doing. I first did the bird in the Old Olive ink and then the branch in the Chocolate Chip ink. Finally I rocked the edges of the bird in the Chocolate Chip ink as well. By the way, the bird and branch image is one stamp, not two.
I sponged all the edges of the of the card stock and designer paper except for the base of the card. It was all sponged in Chocolate Chip except the Whisper White was sponged in Not Quite Navy.
As you can see in the second picture, I used the Scalloped Circle to close the card.

I really like this card and think I will make another one with all Stampin' Up! products so I can use it at a workshop.
Recipe:
Stamps: Nature Stamps (by Rhonna Farrer - Autumn Leaves), Everyday Flexible Phrases ("hope"), Warmest Regards ("Thinking of You")
Paper: Bohemia Line Designer Paper (My Mind's Eye), Old Olive, Chocolate Chip, Not Quite Navy, Whisper White
Ink: Chocolate Chip, Old Olive, Not Quite Navy
Accessories: Brads (makingmemories), Sponge Dauber, Scalloped Circle Punch, 1 3/8 Circle Punch, 1 1/4 Circle Punch
4.25 x 5.5 card
I will have another card to upload soon. So stay posted. :)
Tuesday, October 23, 2007
Take Two

OK, so I had another look at the Weekend Sketch Challenge and realized that I really deviated from it. So I did another card and followed it more closely. A quick and easy card.
Recipe:
Stamps: Enjoy (heidi swapp)
Paper: Very Vanilla, Close to Cocoa, Always Artichoke, K&Company DP, Olive Vellum (Michael's)
Ink: Close to Cocoa
Accessories: Olive Ribbon (Gale's Warehouse), Extra Large Pewter Eyelets, Sponge Dauber
4.24 x 5.5 card
Saturday, October 20, 2007
Weekend Sketch Challenge #24

It actually took me two tries to come up with this card. They both look quite similar but there were certain things that I did not like about the first card I made. For example, with the first card the brads showed on the inside of the card. Didn't like that. I just added another layer of Always Artichoke card stock on top of the Always Artichoke card base. Also, the background looked so plain, so I stamped the mistletoe stamp in Bravo Burgundy on the Bravo Burgundy card stock. I like it so much better now. Oh, I als0 distressed the edges and then sponged them. I seem to be doing a lot of that lately.
By the way, I saw a similar card on a display at the Stampin' Up! booth at the Crop for Kids event last weekend. I am not sure who made this card, but I'll give credit to my "up-up-up-line", Joan, for designing this card. :)
Technique: Using a Marker to Colour on the Stamp
Actually the title is self-explanitory. It is quite simple to have your image stamped in a number of colours without using more than one stamp. All you need to do is use a pigment ink or water-based marker (I used Stampin' Up!'s, but you can also use Le Plume. I find them at Michael's in the scrapbooking section) and colour right on the stamp with your markers. Use as many colours as you like. Don't forget to breathe or "huff" on the stamp to re-moisten the ink. Finally, stamp on your card stock.
Recipe:
Stamps: Peaceful Wishes
Paper: Always Artichoke, Bravo Burgundy, Basic Black, Whisper White
Ink: Bravo Burgundy, Always Artichoke, Bravo Burgundy Marker, Always Artichoke Marker
Accessories: Silver Brads, White Ribbon (Gayle's Warehouse), Sponge Dauber
4.25 x 5.5 card
I made this card a couple of days ago for an upcoming stamp class. When I saw Beate's weekend sketch challenge I figured that I could use it for her challenge too. The only thing is that the horizontal strip goes all the way across on my card and the sketch doesn't show that. Hope that is OK. :)
Tuesday, October 16, 2007
Elegant Happy Harmony

I made this card last week sometime, but haven't had a chance to upload it. I have a few minutes to do this while the Thunder Cake is baking.
Zachary, Caleb and I read a book last night called "Thunder Cake" by Patricia Polacco. There is a recipe at the end of the book to make the same cake that the grandma and little girl make in the story. Zachary was all ready to make the cake last night, but we agreed to make it today during Caleb's nap. It calls for tomato soup.....that's interesting. We'll see how it turns out.
Zachary, Caleb and I read a book last night called "Thunder Cake" by Patricia Polacco. There is a recipe at the end of the book to make the same cake that the grandma and little girl make in the story. Zachary was all ready to make the cake last night, but we agreed to make it today during Caleb's nap. It calls for tomato soup.....that's interesting. We'll see how it turns out.
Technique:
Emboss Resist, Scalloped Edge (see previous posts for instructions)
Recipe
Stamps: Happy Harmony, It's Your Birthday
Paper: Whisper White, Elegant Eggplant, Certainly Celery, Almost Amethyst, Almost Amethyst Designer Paper Series
Ink: VersaMark, Almost Amethyst, Certainly Celery
Accessories: White Embossing Powder, Sponge, Corner Rounder Punch (to make scalloped edges), Ribbon (Michael's)
4.75 x 4.75 card
By the way, the cake is smelling wonderful. Instead of my daily piece of chocolate, I guess I'll have cake instead.
Friday, October 12, 2007
Weekend Sketch Challenge #23

This morning I checked out Beate's Weekend Sketch Challenge and figured I could do this one while the boys were at school. I had all the supplies from the card I made yesterday on my desk so I decided to use them again using this new layout. I made it pretty much the same way as yesterday's card.
Sage Shadow is not been one of my favourite colours. I've used it only one other time. The only reason I have this colour is because I once received a free package of card stock with my order from Stampin' Up! They must have thrown it in by accident. Since I had the card stock, I ordered the matching ink at another time. So when I found this design paper yesterday I saw that the Sage Shadow worked perfectly with it and was not overwhelming. I might have to go to Michael's and buy some more of this designer paper ;).
Recipe:
Stamps: Fabulous Flowers, It's Your Birthday
Paper: Very Vanilla, Close to Cocoa, Sage Shadow, Designer Paper (Sandylion)
Ink: Chocolate Chip, Sage Shadow
Accessories: Sponge Dauber, Cutter Kit (distresser), Blender Pen
4.75 x 4.75 card
Weekend Sketch Challenge #23 Once More

As I was adhering all my card stock together, I realized that there was not room for the jumbo eyelets that I wanted to add. So I just had to make another card..... This time the main image is on a 2.5 x 2.5 piece of Very Vanilla card stock.
The "recipe" is the same as the above post except I added Extra Large Pewter Eyelets by We R Memory Keepers.
Thursday, October 11, 2007
Two Challenges In One

Today I made this card using yesterday's Sketch Challenge and today's Ways to Use It Challenge on Splitcoaststampers. Since I didn't get around to doing the Sketch Challenge yesterday, I was "inspired" to combine it with today's challenge - to add some "bling" to the card. I thought, "Hey, I can do both".....that doesn't happen often for me.
Here's how I made this card: I stamped the large zinnia from the Fabulous Flowers set in Sage Shadow on a 3x3 piece of Very Vanilla card stock. Because I was using dye ink rather than pigment ink, I stamped over the flower using Versamark ink. Then I added the Iridescent Ice embossing powder and heated it with my heat gun. If I had pigment ink in the Sage Shadow, I would have skipped the VersaMark and just added the embossing powder. I also stamped one of the smaller flower from the same set in VersaMark on Sage Shadow card stock, then embossed it with the same EP.
I used a sponge dauber to ink the all the edges of the card stock in Chocolate Chip and then slightly distressed the same edges. I added two gemstones to the designer paper that has the stripes and one to the smaller flower (attached with a glue dot). I also attached two loops of ribbon behind the largest square of the main image. Finally I "glued" everything together. (So far the best adhesive I have used is a tape runner called Ad tech, bought at Walmart. If anyone uses something better, please let me know.)
After I took a good look at the card, I thought the bottom right hand corner was looking kind of "blank". I didn't have any stamps, with sentiments I wanted to use, that were small enough to fit in that corner. So I took the stamp that says, "Someone like you should be celebrated every day" from It's Your Birthday set and coloured "celebrate" with a blender pen inked up in Chocolate Chip. You may ask why I used a blender pen. Well....I don't have a marker in Chocolate Chip.....gasp.....can you believe it??? Hey, don't knock it. You can see proof that it worked!

I also uploaded a close up of the "bling" to give you a better idea of what it looks like.
So that is how this card evolved. Thanks for stopping by.
Recipe:
Stamps: Fabulous Flowers, It's Your Birthday
Paper: Sage Shadow, Very Vanilla, Close to Cocoa, My Mind's Eye Designer Paper, Sanylion Designer Paper
Ink: Sage Shadow, Chocolate Chip, VersaMark
Accessories: Chocolate Chip Ribbon, Sponge Daubers, Cutter Kit (distresser), Iridescent Ice Embossing Powder, Gemstone Brads (the Paper Studio), Glue Dot
4 3/4 x 4 3/4 card
Saturday, October 6, 2007
Weekend Sketch Challenge #22

So here is my version of Beate's Weekend Sketch Challenge. She has two samples posted and I immediately was inspired by the one that was more monochromatic. Click here to see her card using the Simply Said stamp set. I haven't used that set in a while so I decided to use it too. (Plus I love this set and not tired of it yet by any means.) So if you look closely and compare, there are a few changes. ;) In case it is hard to see on the photo, I sponged the edges of the card stock using Old Olive or Certainly Celery ink.
One thing to note: I have used my Coluzzle Cutting System a lot lately and find that it is so easy to use. I am quite happy with it....and it didn't cost much!!
Recipe:
Stamps: Simple Said, It's Your Birthday
Paper: Whisper White, Old Olive, Certainly Celery,
Ink: Old Olive, Certainly Celery
Accessories: Corner Rounder, Circle Coluzzle, Sponge Dauber, 1 3/8 Circle Punch, Scalloped Circle Punch, White Eyelets (makingmemories)
4 3/4 x 4 3/4 card
Weekend Sketch Challenge #22 in Almost Amethyst

After I completed the first card, I decided to do another one, but in Almost Amethyst and Elegant Eggplant. The other change I made was I used the largest two "circles" of the Circle Coluzzle Cutting Template to make the circle bigger. I also distressed some of the edges using the distresser of the Cutter Kit. Love that thing. Works waaay better than my nails!!
Wednesday, October 3, 2007
Hip Hip Hooray for Bellas!

Yesterday on the Splitcoaststampers, I saw that the Colour Challenge was Chocolate Chip, Blue Bayou and River Rock. The only colour that I have is Chocolate Chip. Unfortunately I can't buy everything.....you can't eat card stock ;) So I decided to improvise and use colours that I thought were fairly close in hue - Not Quite Navy and Sahara Sand. And I think these colours work well together. I even found some designer paper that had those colours in it. This was a very quick card to make. By the way, I tried to take a close up of the gemstones on the flowers and dotted "i's" of the sentiment.

Well, I'm off to check out the Sketch Challenge on Splitcoaststampers.
Recipe:
Stamps: Flowahbella, Sentiment (from Michael's $1.50 bin)
Paper: Designer Paper (Bohemian line from My Mind's Eye), Sahara Sand, Naturals White, Not Quite Navy, Chocolate Chip
Ink: Chocolate Chip, Not Quite Navy, Sahara Sand, Ruby Red
Accessories: Ticket Corner Punch, 1 3/8 Circle Punch, Scalloped Circle Punch, Sponge Dauber, Blender Pen, Chocolate Chip Grosgrain Ribbon, Gemstones (the Paper Studio)
4 1/4 x 5 1/2 card
Holiday Glitz Promo
Starts October 1 until supplies run out!
You can take advantage of this kit in two fantastic ways:
1) Purchase one of the following holiday stamp sets below and get the Holiday Glitz card kit (110286) for the special price of $34.95
2) Purchase the Holiday glitz card kit for $39.95 each with no additional purchase required.
Each Holiday Glitz card kit makes 15 cards and includes:
* Precut card stock and Designer Paper Series (15)
* Whisper White Envelopes (15)
* Rhinestone Brads (15)
* Real Red Zigzag Ribbon (15)
* Full-colour instruction sheet (1)
STAMP SETS & PRICE:
$32.95 Snowfall
$28.95 The Snowflake Spot
$28.95 Flacons piquetis
$25.95 Big on Christmas
$32.95 Love & Joy (in the Holiday Mini Catalogue)
Stamp sets can be viewed in the catalogues online at http://www.stampinup.com/.
To make an order, please email me before supplies run out. You can find my email address in "my complete profile".
Sunday, September 30, 2007
My first Bella....

This is my first Bella. Prezzibella. I love these stamps!!! I have been wanting these for a while and I restrained myself to ordering only three. So keep checking back for further uploads of the other Bellas.
This was a very quick and easy card to make. I just used scraps of card stock that I had lying around. Yes, I do keep almost all the scraps. The Certainly Celery strips were long strips of 1/2" card stock adhered underneath the designer paper. I used my Oval Coluzzle to cut around the Bella that I stamped on Whisper White, sponged the edges and tacked it on to a piece of Celery card stock. Then I carefully cut around the oval leaving about 1/8" edge. I didn't use the Coluzzle for the Celery card stock because that edge seemed to be too wide and didn't look right. Oh, and I also used the Corner Rounder Punch to scallop the edges of the designer paper and celery card stock. And of course I used blender pens.... once again.
Recipe:
Stamps: Prezzibella, Hugs & Wishes
Paper: Designer Paper (?? from Michael's), Whisper White, Certainly Celery, Pretty in Pink
Ink: Pretty in Pink, Basic Black, Certainly Celery, Old Olive, Rose Red, Close to Cocoa
Accessories: Celery Grosgrain Ribbon, Corner Rounder Punch, Oval Coluzzle
4 1/4 x 5 1/2 card
Monday, September 24, 2007
Heartfelt Thanks

This is the first time that I have used the sentiment "heartfelt thanks" from this (Heartfelt Thanks) stamp set. And can you believe that this is the first stamp set I bought from Stampin' Up! I was never really happy with how the sentiment turned out when I layered them like this before. Maybe it was the colours I was using. But I am quite pleased with how it looks now.
I basically cased the layout of Beate's card exactly. Yes, I go on to her blog alot! I just changed the colour combo and stamp sets. I liked the design so much that I made another card, but again, with a different colour combo and stamp set. You can view it on my gallery on Splitcoaststampers. It's called Birthday Hugs & Wishes.
Recipe:
Stamps: Heartfelt Thanks, Fabulous Flowers (flower), Everyday Flexible Phrases (my friend), All in a Row
Paper: Certainly Celery Designer Series Paper, Basic Black, Sahara Sand, Very Vanilla
Ink: Basic Black, Certainly Celery, Sahara Sand
Accessories: Ticket Corner Punch, Scalloped Circle Punch, 1 3/8 Circle Punch, 1 1/4 Circle Punch, Round Tab Punch, Silver Cord, Rhinestone Brads (makingmemories), Paper Piercer, Paper Flowers (makingmemories)
4 1/2 x 4 1/2 card
Sunday, September 23, 2007
Charleswood Christmas Card Event
To the women of Charleswood (you know who you are),
In the following six posts, I have uploaded a photo of the Christmas cards and the names of those who would like to make that particular card. For those of you who have not made any choices please let me know which ones you'd like to make in the Comment section. Also in the Comment section, please let me know how many of each card you would like to make so I can prepare accordingly. Please note that there might be some changes in the choice of ribbon we use. It all depends on what is available.
Andrea
PS If you get to the bottom of the page and you do not see six cards, click on Older Posts. That should get you to the rest of them.


# 5 All Spruced Up

I know that some of you might not want the sentiment "all spruced up" on your card. Let me know whether or not you want that sentiment on the front of the card. If not, I'll just cut the card stock down to size and have only the tree.
Charlotte
Rachel
Kim (10 cards without the sentiment)

Friday, September 21, 2007
Weekend Sketch Challenge #20

Friday mornings are one of my "free" mornings. Zachary is in Kindergarten and Caleb is at nursery school. So instead of cleaning the house or running errands, I started Beate's weekend sketch challenge. I finished it after lunch while the boys were playing a game on the computer.
Technique: Scalloped Edge
To create a scalloped edge on card stock there a only a few simple steps. Take SU's corner rounder punch and gently remove the base of the punch. Place the card stock in the punch and press to punch out a scallop. Move the punch over so you can see a tiny bit of space of the previous scallop and punch again. Continue on. Just a note: I often do not begin at the edge of the cardstock but slightly in from the edge so that the first scallop is not a "whole" scallop. Hope that makes sense.
Recipe:
Stamps: Fun & Fast Notes, Broque Motifs (swirls on pink dp), Butterfly (unknown)
Paper: My Mind's Eye Designer Paper, Whisper White, Chocolate Chip, Close to Cocoa
Ink: Chocolate Chip, Whisper White Craft, Pretty in Pink
Accessories: Corner Rounder Punch, Photo Corners Punch, Scalloped Circle Punch, White Grosgrain Ribbon, 1 3/8 Circle Punch, Blender Pen, Paper Piercer
5 1/2 x 4 1/4
Fabulous Zinnias

I love zinnias. Every spring, at the end of May, I plant zinnia seeds in two flower beds between the side of my house and driveway. And all spring I wonder if it is worth it because they only begin to bloom in the middle of July (and here in Manitoba it feels like summer is almost over -no exaggeration*wink*). But when they do bloom, I realize it is sooo worth the wait. The flower bed is thick with zinnias and so colourful.
So, I had to get the Fabulous Flowers stamp set from SU..... just because of the large zinnia stamp. Then the other day at Michael's I found this wonderful designer paper that had zinnias on it as well. And out of that came this card.
By the way, this was my creation of the Sketch Challenge #142 on Splitcoaststampers.
Enjoy!
Recipe:
Stamps: Fabulous Flowers, Warm Words
Paper: Confetti White, Chocolate Chip, Old Olive, My Mind's Eye Designer Paper
Ink: Whisper White Craft, Brocade Blue, Old Olive, Chocolate Chip
Accessories: White Grosgrain Ribbon, Corner Rounder Punch, Clear Embossing Powder, Sponge, Sponge Dauber
5 1/2 x 4 1/4 card
Monday, September 17, 2007
Oh, So Lovely

I saw the layout for this card on one of my favorite blogs, Pink Tulle with Feathers and Sequins (see side bar). It was super easy to make. I used one of my favourite things: blender pens. I love colouring with them!
Technique: Watercolouring with Blender Pens
All you need to do is squish the ink pad when it is closed so that the lid will pick up the ink from the pad. Open up the ink pad and there will be colour on the lid. Dip your blender pen in the ink on the lid and colour away. Easy as one-two-three!
Buy the way, the ribbon is a very close match to SU's Rose Red card stock. Not red as the photo shows!
Recipe:
Stamps: Oh, So Lovely (SU Level 1 hostess set), BG Print Pattern, Simply Said (sentiment)
Paper: Whisper White, Pretty in Pink, Basic Black, Rose Red
Ink: Pretty in Pink, Basic Black, Rose Red, Certainly Celery
Accessories: Corner Rounder, Ribbon (Michaels), Blender Pen
5 1/2 x 4 1/4 card
Sunday, September 16, 2007
Simply Square In the Spotlight

I can't believe the weekend is over. I did find the time to make a few cards this weekend during naptime/quiet time. Here is one of them and I will find the time to post the others I made sometime during the week.
I CASED this card from tashers on Splitcoaststampers (her blog is Palmtrees andPogosticks - see sidebar). I added the Old Olive background which she did not use, as well as the scalloped punch. I also sponged the scalloped edges with Bordering Blue. Tried to make it my own, but she had a great design using only one stamp set. Hurray!!
Recipe:
Stamps: In the Spotlight
Paper: Whispering White, Old Olive, Bordering Blue, Not Quite Navy
Ink: Old Olive, Bordering Blue, Not Quite Navy
Accessories: Scalloped Circle Punch, 3/4" Circle Punch, Circle Coluzzle, Sponge Daubers
4 3/4 x 4 3/4 card
And Another One

This is the second card I made with same design but using Close to Cocoa card stock instead of Old Olive.
Recipe:
Stamps: In the Spotlight
Paper: Whisper White, Close to Cocoa, Bordering Blue, Not Quite Navy
Ink: Close to Cocoa, Bordering Blue, Not Quite Navy
Accessories: Scalloped Circle Punch, 1/2 " Circle Punch, Circle Coluzzle, Sponge Daubers
4 3/4 x 4 3/4 card
Have a good week.
Andrea
PS. Every time I do a post, the spacing/format is different. I didn't want double spacing the the "recipe" section. And I can't figure out why, because I'm not doing anything different. So I apologize for the different look. Maybe someone else knows what is going on?!?
Tuesday, September 11, 2007
Sketch Challenge

This is the card I made for last week's sketch challenge on Splitcoaststampers. I have finally found the time to upload it. With Zachary starting Kindergarten (and Caleb back at nursery school) I feel like I have begun a new job as well. We are having very early mornings compared to the summer. I have to get used to this new routine and not feel quite as harried. It will get easier.
A couple things to note about this card since it is hard to see on the photo: I used the "dotted" print stamp on the Bashful Blue card stock with Bashful Blue ink, stamped the three-flowered stamp over it with VersaMark and finally, embossed with clear embossing powder. I also distressed and sponged all the edges of the card stock except for the card base in Sahara Sand.
Technique: Rock & Roll
Using the Rock and Roll techique is simple but fun. Make sure you are using a bold image stamp. Stamp your image in a light coloured ink first and then roll the edges in a darker colour ink. Now stamp on your card stock. Done! Very easy. Make sure you are using light ink first otherwise you will add ink to the second ink pad. If this does happen, lightly dab away the darker ink with a paper towel or baby wipe.
Have a great day!
Recipe:
4 1/4 x 5 1/2 card
Stamps: Looks Like Spring, Holidays & Wishes (from the heart)
Paper: Sahara Sand, Bashful Blue, Whisper White, Basic Black
Ink: Sahara Sand, Bashful Blue, Basic Black, VersaMark
Accessories: Clear Embossing Powder, Cutter Kit (distresser), Ribbon (Michael's), Silver Brads, Gemstone (Paper Studio), Sponge Dauber
Saturday, September 8, 2007
Weekend Sketch Challenge #18

This is the second weekend in a row that I have tried Beate's weekend sketch challenge. I am finding that it can be so much easier using someone's layout and all I have to come up with is the paper, stamps and accessories. Sometimes it makes it half the work.....when you're inspired that is.
A few things about this card that are a little hard to see on the picture are:
1. I distressed most of the edges of the card stock using the distressing tool from the Cutter Kit. Much easier than using you nail!!
2. I outlined the edges of the flower using a two-way glue pen and sprinkled Dazzling Diamonds Glitter on top.
3.There are four diamond gemstones in the punched out ticket corners.
4. To attach the ribbon, I used the Horizontal Slot Punch under the scalloped circle area to hide the hole and then thread the ribbon through the hole and around the edge of the card. So the ribbon does show on the inside of the card.
5. To create the scalloped circle, I used the Coluzzle circle to cut a circle and then used the Corner Rounder punch around the edge. Don't forget to take off the base. It just snaps off.
Happy stamping!
Andrea
Recipe:
4 1/4 x 5 1/2 card
Stamps: Heartfelt Thanks, Warm Words
Paper: Petals & Paisley Designer Paper, Pretty in Pink, Old Olive, Whisper White, Taken with Teal
Ink: Pretty in Pink, Old Olive
Accessories: Pink Grosgrain Ribbon, Two-way Glue Pen, Dazzling Diamonds Glitter, Gemstones (Paper Studio), Ticket Corner Punch, Horizontal Slot Punch, Word Window Punch, 1/16 Handheld Circle Punch, Coluzzle Circle, Cutter Kit (distresser)
Wednesday, September 5, 2007
Artfully Asian Thankyou

This is a card I made for a friend. It was quick and easy.
I've been looking everywhere for square envelopes that will fit 4.25 x 4.25 cards. So far they are impossible to find. What I did find were envelopes that fit 5 x 5 cards at Michael's. And guess what? I was able to use my 50% off coupon this last weekend....I saved $9....woohoo!The box contains 40 cards and envelopes with various types of embossing on it. We'll see what I can come up with...kind of boring since they are all white.
On this card the "Thank you" is embossed. I carefully traced the letters with my Versamarker pen and then used a sponge dauber with mellow moss chalk and lightly daubed the letters. I tried to do the same with three embossed lines that bordered the outside of the card, but that did not turn out so I cut the edges off. I stamped the blossom branch with ink and then used the blender pen and chalks to colour in the flowers. As Caleb (age 2.75) would say, "easy-peasy". Because I had to cut the card, it didn't have a fold anymore. I made a new card base out of whisper white card stock, cut a piece of perfect plum card stock, used the ticket corner punch on the original white card stock, sponged the edges with mellow moss ink and adhered it all together. Wallah!
And the moral of the story is: you can usually fix your mistakes when making cards or scrapbooking.
Happy stamping!
Andrea
Recipe:
5 x 5 card
Stamps: Artfully Asian
Paper: Whisper White, Perfect Plum
Ink: Mellow Moss, Close to Cocoa, Versamarker
Accessories: Chalks, Blender Pens, Sponge Daubers, Ticket Corner Punch,
Saturday, September 1, 2007
Stampin' Up! Promotions
The Fall Frenzy Promotion runs from September 1-30. Spend $40 in regular priced merchandise and qualify to purchase one of each of the eight stamp sets listed below at
30% off.
#105355 Bitty Boos Too $17.47
#109284 Haunting Halloween $18.17
#107383 Thoroughly Thankful $22.37
#109373 Autumn Fest $23.07
#109421 Elementary Essentials$27.27
#110366 Stem Silhouettes $30.77 (from mini catalogue)
#110388 A la Tige $30.77 (from mini catalogue)
#110211 Halloween Hantee $18.17
Choose Your Family Promotion is a promotions for those of you who would like to become a Stampin' Up! demonstrator. When you sign up before September 30, you will be able to pick one colour family of the Classic Stampin' Pads FREE (12 for a $79.95 value). Email me if you are interested in more information.
Coming up in October is the World card Making Day Promotion. It runs for ONLY 4 DAYS (October 4-8). To celebrate, Stampin' Up! is offering 20% off ALL Simply Stampin' Card Kits (page 12-14 in the Idea Book and Catalogue). These kits are great for beginner and busy stampers. You receive instructions as well as ALL supplies to make at least ten cards. They also make wonderful gifts.
Contact me if you would like to make an order or have any questions.
Andrea
Weekend Sketch Challenge #17

Ok, I think I am getting into this challenge thing. This card did not take me all morning to make, like the last one. I'm very happy about that because then it doesn't seem so daunting.
I found this challenge on Beate's website, fresh and fun (click on side bar to view). She makes wonderful cards and I always find inspiration and great ideas when I look at her work. She has made a great sketch and I will definitely use it again....maybe in a square card next time. (The frustrating thing about square cards, 4 1/4 x 4 1/4, is that it is so hard to find envelopes that size. If anyone knows where I can find some in Canada, please let me know.)
I think Soft Subtles is my favourite colour family from Stampin' Up!'s ink and paper. I find that it is so easy for me to find colours that go together. But this time I decided to throw in something else - Real Red. I think that is the only colour I own from the Bold Brights family. And I like how it turned out.
Technique: Emboss Resist
The technique I used was Emboss Resist. I coloured my stamp with a Certainly Celery marker on the stems and a Versa Marker on the flower heads. Stamped, poured clear embossing powder on and then used my heat gun. I used a Stamping Sponge with Bashful Blue ink to sponge around the embossed flower heads. And lastly, just wiped the ink off the embossed flower with a kleenex. Easy. And I love the look of emboss resist and need to do it more often.
Have a great long weekend and happy stamping!
Andrea
Card Recipe:
4.25 x 5.5 card size
Stamps: Happy Harmony
Paper: Bashful Blue, Whisper White, Real Red, Certainly Celery, Certainly Celery Design Series Paper
Ink: Bashful Blue, Real Red, Certainly Celery Marker, Versa Marker
Accessories: red eyelets (makingmemories), Michael's ribbon, paper piercer, mat pack, clear ep, circle coluzzle
Friday, August 31, 2007
First Challenge

I did my first sketch challenge from Splitcoaststampers this week....and my first upload on that site as well. And boy, did I find it challenging. It took me most of the morning to make this card and most of the evening to upload the card.
I tried using two pieces of designer paper but it just didn't seem to look that great. So I decided to stamp on the Old Olive card stock instead. The piece of dp that I did use is a little darker in real life. I also sponged the edges with Chocolate Chip ink.
It isn't my favorite card that I've made but I thought I'd post my first challenge on my new blog :)
Stamps: In the Spotlight, Baroque Motifs
Paper: Brocade Backgrounds Designer Paper, Chocolate Chip, Very Vanilla, Rose Red, Old Olive
Ink: Chocolate Chip, Rose Red, Old Olive
Accessories: Chocolate Chip Grosgrain Ribbon, Sponge Daubers, Scalloped Circle Punch, 3/4" Circle Punch, 1 3/8 Circle Punch, Staple, Making Memories Crystal Brads
Thursday, August 30, 2007
Yikes!
I can't believe that I am doing this. I am not computer savvy at all! And now I am going to attempt this blogging thing. I've been viewing other people's blogs (mostly card making ones) for a couple of months now and have decided to try one of my own. I think I must be crazy!
One of the reasons I'd like to blog is to try to keep a record of some the projects, cards and scrap booking, that I do. And maybe in the process someone will have a look and leave a comment or two.....maybe.
We'll see how it goes and how long it will take me to figure things out. OK, I'm going to click on Publish and see how it looks.... . Wait, I just saw the Preview "button".... See, this will take me some time to figure things out.
Subscribe to:
Posts (Atom)

+of+IMG_8260.jpg)

