Wednesday, May 28, 2008

Inchie Card and Colour Challenge #168

Yesterday on Splitcoaststampers, the Colour Challenge issued was to use Chocolate Chip, Sage Shadow and Very Vanilla. Sage Shadow is not my favourite colour, as I've said before, but I knew exactly which designer paper I wanted to use (Iron Gate by Sandylion. I think I found it at Michaels). I combined it with the Ways to Use It Challenge #166. (I posted a card yesterday that also used the WT166.)


Supplies:

Stamps: Live Your Dream, Warm Words
Paper: Chocolate Chip, Sage Shadow, Very Vanilla, Iron Gate Designer Paper (Sandylion)
Ink: Chocolate Chip, Sage Shadow
Accessories: Mat Pack, Paper Piercer, Antique Copper Brads, Ribbon (Michaels)

4.25 x 5.5 card

Thanks for stopping by.

Tuesday, May 27, 2008

Ways To Use It Challenge #166

A couple of weeks ago, the Ways to Use It Challenge was to use Inchies. Inchies are images on one inch pieces. I had never done this before and it definitely looked interesting.


This card is just one of the ways you can go about using Inchies. I stamped my image on a 3 x 4 piece of card stock and then cut it into one inch pieces. I sponged around ALL the teeny, tiny squares. That took some time!! Then I adhered them to a 3 3/8 x 4 3/8 piece of Chocolate Chip card stock. I then layered the main image piece onto Creamy Caramel (also sponged) and a Chocolate Chip card stock.


With the bird and the branch image, I first stamped in VersaMark and then in Chocolate Chip ink. I stamped on Naturals Ivory and embossed with Clear Embossing Powder. After I cut them out, I popped them up with dimensionals.


Supplies:


Stamps: Tres Chic, Holidays & Wishes, Nature Stamps by Rhonda Farrer (Autumn Leaves)
Paper: Chocolate Chip, Creamy Caramel, Naturals Ivory
Ink: Creamy Caramel, Chocolate Chip, VersaMark
Accessories: Dimensionals, Clear Embossing Powder, Antique Copper Brads, Sponge Dauber


4.25 x 5.5 card


Another time I would like to try putting a single image, a very small one of course, on an inchie.....Hmmm, maybe I can make some time now.


Thanks for stopping by.

Thursday, May 22, 2008

Round About Flower Fusion

I have been very lax about posting cards. I can't seem to get the things done that are on my "to do" list. I won't bore you with my list. :) This seems to be a theme in the last couple of weeks. Sorry.

This is one of the cards that I we will be making at the Stamp Class on Monday. It was inspired by Beate Johns of Fresh & Fun. It is always fun to make a card that is a little bit different.

Supplies:

Stamps: Tres Chic Background, "Stems" from Springtime Stems (retired)
Paper: Pumpkin Pie, Chocolate Chip, Bashful Blue Designer Series Paper, Certainly Celery Designer Series Paper
Ink: Old Olive, Pumpkin Pie
Accessories: Flower Fusion, Silver Brads, Mini Glue Dots, Paper Snips (to make grass)

4 x 4 Circle Card

Thanks for stopping by.

Monday, May 19, 2008

Sketch For You To Try

This weekend I've been working on Jen's Sketch For You To Try on and off. I actually made two cards because I wasn't happy with the balance of the first card.

Here is Card #1 made on Saturday.


Here is Card #2 made today. I did actually have a sentiment stamped on two circles that I was going to add. I somehow forgot to tape it down before I took the picture and only just realized it now. Oh well. It is a very simple. I also paper pieced the patterned paper on to the Bella's dress.

Supplies:

Stamps: Lotus Greeting Stamps (K & Company) on Card #1, Flowabella (Stamping Bellas ) on Card #2
Paper: Oasis Paper Stack (SEI), Bordering Blue, Chocolate Chip, Whisper White
Ink: Brown Stazon, Chocolate Chip, Close to Cocoa, Bordering Blue
Accessories: Card #1 - White Eyelets, Ticket Corner Punch, Chocolate Chip 15/16" Satin Ribbon
Card#2 - Small Corner Rounder Punch, Antique Copper Brads, Blender Pen

4.75 x 4.75 card

Thanks for stopping by.

Friday, May 16, 2008

Cherish Spring

Here in Manitoba is seems like Winter just hangs on forever and Spring takes a long time in coming. Well, I think it is finally here. The leaves on the trees are starting to come out (it is very late this year), the perennials are popping up and I've bought two hanging planters with geraniums. Yesterday I hauled out the flower pots and now I'm anxious to buy some annuals and get those planted.

I haven't stamped that much this past week because the weather has been so nice. This card is one that I made in the last week and a half or so. A couple things to note: I used VersaMark and small flower stamp from Live Your Dream on the background square of Certainly Celery card stock only on the top third. Also, it took two tries to cut out the main flower image. Very tricky where the flower meets the stem. It is hard not to bend and ruin it. :)


Supplies:

Stamps: Live Your Dream, Warm Words
Paper: Whisper White, Elegant Eggplant, Certainly Celery, Almost Amethyst Designer Series Paper
Ink: Elegant Eggplant, Certainly Celery, Rose Red, VersaMark
Accessories: Distresser, Dimensionals, Giga Scalloped Circle Punch (Marvy), Mega Circle Punch (Marvy), Lavender Ribbon (Michaels)

4.75 x 4.75 card

Thanks for stopping by.

Thursday, May 15, 2008

Stamp Class Sneak Peaks

Hello all of you from Winnipeg! I thought I'd post sneak peaks of the some of the cards we will be making at the stamp class. Easier than doing it through email.


All five cards will use a Stampin' Up! stamp set and feature a technique and various Stampin' Up! accessories that add that extra pizazz to a card. You can "Wow" your friend or family member that receives a card that you have made.


And now...... (drum roll)... featuring.....


Card #1 with the Styled Silver Ribbon Slide


Card #2 with Flower Fusion Very Round About


Card #3 with Live Your Dream with Fine Cosmo Glitter


Card #4 with Very Square Cracked Glass Technique


Card #5 TBA


I hope this tweaks your curiosity and I'd love to hear from you soon. By the way, I will post the full card after the stamp class has occurred.

Thanks for stopping by.

Tuesday, May 13, 2008

New Amy Butler Clear Stamps

The new paper and stamps are my sale purchases from Michael's last week. I think the paper and the stamps coordinate very nicely even though they are from two different companies. It's nice when that works out. Makes it more versatile.


This first card is super easy. I stamped the "medallion" in black stazon and cut it out. The "thank you" is a separate stamp that actually can be taken out of the medallion if you want to use it some other place. I was very excited when I found that out. Versatile, again. Next I took a little flourish stamp, inked it in Old Olive, stamped off on a piece of scrap and then four times in the center of the medallion. I added ribbon and brads and Voila....done.

The second card is pretty simple too, but it took me a bit longer to figure out what I wanted to do with it. The main "urn-like" image had the "happy birthday" inside it, but I was able to take it out and stamp it at the bottom of the card. In retrospect, I think next time I will stamp the sentiment in Cameo Coral to match the scalloped square. The "leaves" in the centre of the urn is stamped off first before stamped on the card stock. The butterfly is inked in Cameo Coral and then "rock and rolled" in Ruby Red.


Supplies for both cards:

Stamps: Lotus Greeting Stamps by Amy Butler (K & Company)
Paper: Oasis Paper Pack (SEI), Whisper White, Old Olive, Basic Black
Ink: Black Stazon, Old Olive, Cameo Coral, Ruby Red
Accessories: Dimensionals, Gingham Ribbon, Olive Satin Ribbon (Gales), Black Brads, Square Scalloped Punch (Marvy)

4.25 x 5.5 card

Thanks for stopping by.

Monday, May 12, 2008

Weekend Sketch Challenge #47

Aaahh.....I am trying to find the time. Sorry for the infrequent posts. I will try to do better..... I was able to participate in Beate's Weekend Sketch Challenge on Friday and I haven't had time to post it until now. Aaahh..... Even so, this will be a short post. I seem to have a long list of things to do and no time to complete them. I have accomplished making one large and two small lasagnes this morning. The large one is going to a friend who just had a baby, one small one is going in the freezer and the other we will eat for dinner.


When I saw this paper, I knew that I wanted to use my Nature Stamps by Rhonda Farrer. The flowers in the oval is "watercoloured" with an aquapainter.

I found this K & Company paper at Michael's this last week for 40% off. I love sales!! This is the Hannah paper pad. I also found some Amy Butler Clear stamps, also by K & Company, on sale. Did I just say that I love sales?!? The background is stamped off with an image from this new set. The tiny butterfly and the "thank you" is from this set as well.
Supplies:

Stamps: Nature Stamps by Rhonda Farrer (Autumn Leaves), Amy Butler Clear Stamps (K & Company)
Paper: Hannah Paper Pad (K & Company), Naturals Ivory, Ruby Red
Ink: Ruby Red, Old Olive, Cameo Coral
Accessories: Olive Satin Ribbon (Gale's), Paper Piercer, Mat Pack, Oval Coluzzle, Giga Oval Scalloped Punch (Marvy), Dimensional, Sponge Dauber

4.25 x 5.5 card

Thanks for stopping by.

Wednesday, May 7, 2008

Green Polka Dots and a Little Bling

Just a quick post while the pizza is baking in the oven. It is a fairly straight forward card, I think, and looking at the supply list pretty much tells you how the card was made. Sorry, I definitely don't have much to say today. I guess my brain is fried and my stomach is hungry. LOL
Supplies:

Stamps: Live Your Dream, So Many Sayings (retired)
Paper: Naturals White, Old Olive, Certainly Celery, Pure Designer Paper (Fancy Pants)
Ink: Certainly Celery, Pretty in Pink
Accessories: Dimensionals, White Satin Ribbon (Michaels), Corner Rounder, Paper Piercer, Mat Pack, Pink Rhinestones (Michael's - Darico??)
4 x 5 card

Thanks for stopping by.

Tuesday, May 6, 2008

Card Therapy


I love the simple, clean style of I {heart} 2 Stamp. A while back I saw THIS card of hers and decided to CASE it. (By the way, CASE means "Copy And Share Everything".) Sometimes it seems like I can't do the the very simple cards without any or at least very minimal layers making it a very clean look. I think I need layers to cover up the imperfections. Sponging and distressing are great things when you need to cover up mistakes. Even on this card, I had to add another piece of patterned paper besides the polka dotted paper and ribbon as well. I guess that means that I can use other peoples' ideas and make them my own. And that's OK because I'm moving in the right creative direction . (This is starting to sound like card therapy. LOL)

Supplies:

Stamps: Live Your Dream, Warmest Regards (retired)
Paper: Anna Griffin Designer Paper, Naturals White, Barely Banana
Ink: Rose Red, Mellow Moss
Accessories: Taffeta Blue Ribbon, Scalloped Punch, 1 3/8" Circle Punch, 1 1/4" Circle Punch, Dimensional, Rose Cosmo Glitter, Two-way Glue Pen

4.25 x 5.5 card

Thanks for stopping by.
P.S. I'm still trying to get the lighting right when I'm taking a picture of a card. Please be patient.

Monday, May 5, 2008

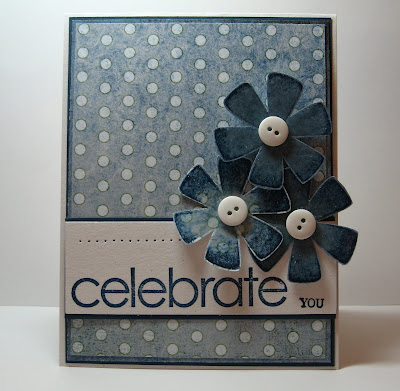
Celebrate You in Polka Dot Blue


Happy Monday. Today's card was inspired by Amy from Pickled Paper Designs. This is a blog I look at everyday and pretty much like every card she makes. I really liked the layout and cut out flowers on her card and I took it from there to create my card.

Maybe you've already noticed that this card is similar in colours and techniques as a previous card I've posted. This card is actually the first card I made. All the details on making the flowers are in that post. The one think I forgot to mention was that I stamped the flowers on the Basic Grey designer paper.

Supplies:

Stamps: Ginormous Flowers, Celebrate Everything
Paper: Naturals White, Not Quite Navy, Oh Boy line (Basic Grey)
Ink: VersaMark, Not Quite Navy
Accessories: Clear Embossing Powder, Paper Piercer, Mat Pack, Glue Dots, Dimensionals, White Buttons (unknown), Stamp-a-ma-jig

5.5 x 4.25 card

Thanks for stopping by.

Saturday, May 3, 2008

Another Weekend Sketch Challenge #46

I made another card using Beate's Weekend Sketch Challenge, except I flipped it around to make it stand lengthwise.


I used the technique, Misting with Markers, on this card. I did not actually use markers to colour the stamp, but used the ink pads to stamp on top of the stamp. The concept is the same.


Supplies:


Stamps: Live Your Dream, "Hi" from Studio G clear stamps
Paper: Chatterbox Designer Paper, Bashful Blue, Pumpkin Pie, Very Vanilla
Ink: Old Olive, Brocade Blue
Accessories: White Eyelets, Eyelet Setter Tools, Water Mister, 3/4" Circle Punch, 1" Circle Punch, Label Punch, Slot Punch, Orange Satin Ribbon (Michael's)


6 x 3 card


Thanks for stopping by.

Friday, May 2, 2008

Weekend Sketch Challenge #46

I had this Basic Grey designer paper still sitting on my desk (the Oh Baby line) from a previous card that I have yet to post. So it was convenient to use for Beate's Weekend Sketch Challenge.

The flower from Ginormous Flowers is stamped in VersaMark and rolled in Not Quite Navy ink and them embossed three times with Clear Embossing Powder. The word "celebrate" is also embossed. When an image is embossed more than once, it gives it a thicker and smoother look. As a result, the flower curls up a bit, which is an added bonus.

I also used Clear Micro Pellets as embellishments. I stuck them on with Mini Glue Dots. By the way, I found them at Dollarama and there are 1,000 in the package. I think they will last my lifetime. LOL

Supplies:

Stamps: Ginormous Flowers, Celebrate Everything
Paper: Oh Baby line (Basic Grey, Bordering Blue, Not Quite Navy, Naturals White,
Ink: Not Quite Navy, VersaMark
Accessories: Clear Embossing Powder, Glue Dots, Dimensionals, Clear Micro Pellets, Stamp-a-ma-jig, Small Corner Rounder Punch, Sponge Dauber

3 x 6 card

Thanks for stopping by.

Thursday, May 1, 2008

Very Busy Flowabella

At the beginning of the week, I tried Jen's Sketch For You To Try. She has a great blog called I {heart} 2 Stamp that I often browse through for ideas and inspiration. A while back I saw a challenge on Splitcoaststampers that called for you to use two or more pieces of designer paper/patterned paper (TLC157). I do add two kinds of DP to my cards sometimes, but with this card it is very deliberate and very contrasting patterns (They do come from the same line - Infuse by Basic Grey).

You may also have noticed that I paper pieced the Bella's dress with the striped Invest DP. To do this, I stamped the Bella on the patterned paper, cut it out and glued it on. This technique works best with line image stamps.

By the way, I love questions and am happy to answer any that you may have. Sabine asked what kind of stickles I used on this post HERE. They are called Cinnamon Stickles by Ranger. I found them at my local scrapbook store (Here in Winnipeg, I found them at Dalcrafts). They are $2.40 for a 0.5 oz. bottle.
Supplies:

Stamps: Flowabella, Much Appreciated
Paper: Naturals White, Chocolate Chip, Purify & Invest Designer Paper (Infuse line by Basic Grey)
Ink: Brown Stazon, Ruby Red, Rose Red, Mellow Moss, Chocolate Chip
Accessories: Rose Ribbon (Gale's), Small Corner Rounder Punch, Pewter Jumbo Brads, Crop-o-dile, Round Tab Punch, Dimensionals, Two-Way Glue Pen

4.25 x 5.5 card

Thanks for stopping by.