June Stamp Club Card
Directions:
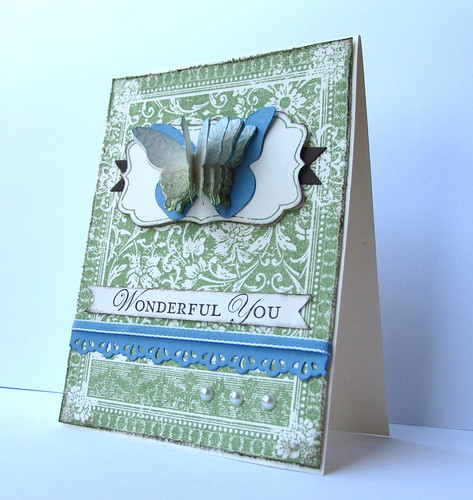
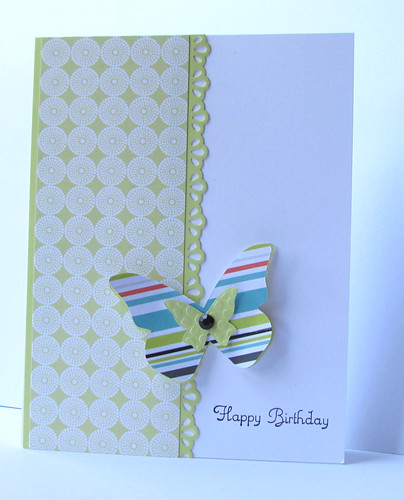
Butterfly Image:
I embossed the Vanilla card stock, punched out 12
butterflies using the NEW Elegant Butterfly punch and sponged the top edges of
each butterfly with Marina Mist ink and the bottom edges with Wild Wasabi ink.
NOTE: If you want a
fuller Honeycomb effect, you will need to punch up to 25 butterflies.
Adhere completed “honeycombed” butterfly to the Marina Mist
Bigz butterfly.
Sentiment Banner:
I used the Out of the Box with Nestibilities Technique to
create a longer banner. (I saw this
technique a long time ago and used the same concept to create the banner. HERE
is the technique to give you an idea on how to do this with a framelit.)
Make sure the width of the Vanilla strip is slightly smaller
than the framelit. Around 7/8” should
work but you might have to make some adjustments.
Stick one end of the card stock strip underneath the
banner. This is the end that will be
cut. The other end of the card stock
strip will need to be pulled through so that it is lying on top of the banner.
When you run the framelit and card stock through the Big
Shot, make sure that you only turn until the one end of the banner is cut. If you run it over the entire framelit, it
will make an indent on the card stock where the opposite end of the framelit
is. That dent will probably turn out to
be in the middle of the banner.
Take out card stock, and turn around and complete other side
of banner.
Stamp sentiment with Early Espresso ink and sponge.
Other instructions to complete card:
Stamp Ex Libris stamp on a large piece of Vanilla card
stock. Cut out rectangle image. Distress
edges and sponge with Early Espresso ink.
Stamp Ex Libris again, cut out label image and sponge with
Early Espresso ink.
Cut Early Espresso Banner in half and adhere to large
rectangle Ex Libris. Pop up label image
of Ex Libris with dimensionals and place over the Espresso banners. Adhere butterfly to the label.
Place edgelit 1/8” away from edge of Marina Mist card stock
strip. Run through the Big Shot. Use a paper piercer to punch out any eyelet
pieces that didn’t fall out.
Add border, ribbon, sentiment banner and pearls to card.
Supplies:
Stamps: Ex Libris
Background Stamp, Loving Thoughts
Paper: Very Vanilla,
Early Espresso, Marina Mist
Ink: Wild Wasabi,
Early Espresso, Marina Mist
Accessories:
Beautiful Butterflies Bigz Die,
Banner Framelit, Elegant Butterfly Punch, Finishing Touches Edgelit, Sponge
Dauber, Sponges, Basic Pearls, Edge Distresser, Marina Mist ¼” Ribbon,
Dimensionals, Glue Dots. Starburst Embossing Folder, Big Shot, Paper Piercer
Dimensions:
Very Vanilla: A2 Card
Base, Scrap for Ex Libris stamp and label of same stamp, 7/8 x 4 strip for
sentiment, embossed scraps for elegant butterflies
Early Espresso: scrap
for banner
Marina Mist: 4-1/8
strip for edgelit border, scrap for Bigz butterfly
Thanks for stopping by.


+of+IMG_8260.jpg)

