skip to main |
skip to sidebar
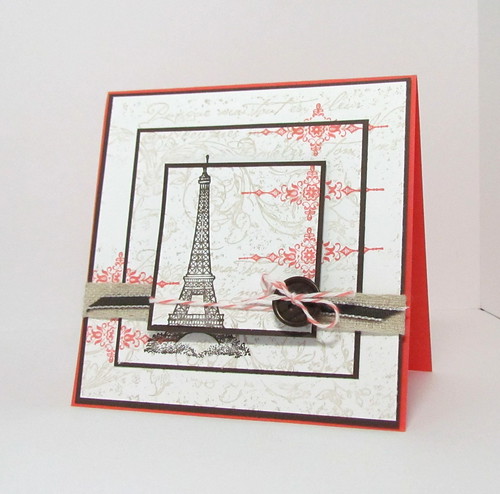
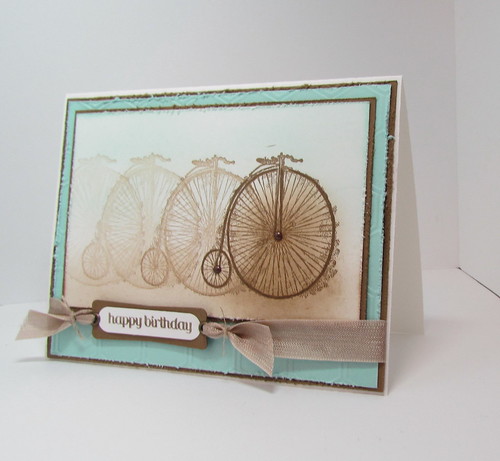
May Stamp Club Card
Triple Stamping Technique
You can find a great tutorial on the Triple Stamping Technique on Splitcoaststampers. I followed these instructions using the Artistic Etchings stamp set and the Very Vintage Jumbo Wheel to make my card.
Converting the Wheel to a Clear Mount Stamp
By the way, I don't actually use Very Vintage in it's "wheel form" anymore. I have taken it off the wheel and use it as a background stamp. Once again, Stampin' Pretty has a great tutorial on how to take your stamp off the wheel. Just click HERE.
Supplies:
Stamps: Artistic Etchings, Very Vintage Jumbo Wheel
Paper: Early Espress, Calypso Coral, Whisper White,
Ink: Crumb Cake, Calypso Coral, Early Espresso
Accessories: Natural Ribbon, Early Espresso 1/8" Ribbon, Calypso Coral Baker's Twine, Button, Glue Dots, Dimensionals
Thanks for stopping by.


May Stamp Club Card
3 x 3 Card and Envelope
Envelope: Using the Stampin' scoring tool and diagonal plate, score at 2- 1/4" at top and bottom corners. Flip patterned paper 180 degrees and score again at both corners. Fold to make envelope.
I found a great template of various envelope sizes on the Stampin' Pretty blog. Click HERE to download instructions.
Supplies:
Stamps: Best of Everything
Paper: Floral District DSP, Whisper White, Old Olive, Tangerine Tango
Ink: Old Olive and Tangerine Tango Markers, Early Espresso
Accessories: Scoring Tool, Diagonal Plate
Thanks for stopping by.

April Stamp Club Card
This month we made three cards at our stamp club workshop. It was a very quick and easy card using the new photopolymer stamp set, Designer Typeset(see banner). It works well with the latest trend of having strips of patterned paper on a diagonal. One detail that is hard to see in the photo is that there are two scored diagonal lines underneath the "happy birthday".
Patterned paper strips are about 3/4" wide. Tape them down to card stock, flip over and trip off over hanging edges.
Supplies:
Stamps: Designer Typeset, It's Your Birthday (retired)
Paper: Sycamore Street DSP (SAB), Whisper White, Rich Razzleberry
Ink: Rich Razzleberry, Basic Black
Accessories: Scoring Tool, Scissors
Thanks for stopping by.
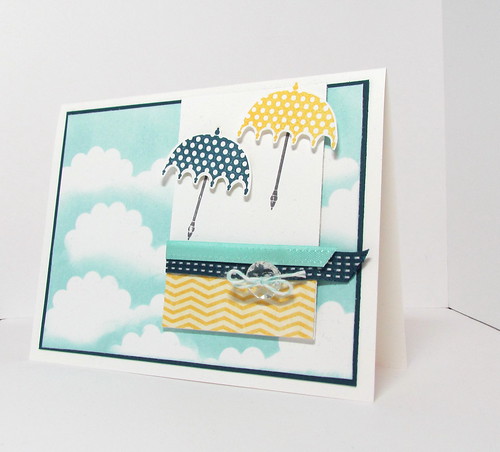
April Stamp Club Card
Directions to make the cloud background:
Punch out four scalloped circles and trim off bottoms. Tape together to resemble a grouping of clouds. Place over white card stock and sponge area in a circular motion with Baja Breeze ink.
Supplies:
Stamps: Rain or Shine
Paper: Midnight Muse, Whisper White, Sunshine and Sprinkles DSP
Ink: Baja Breeze, Daffodil Delight, Midnight Muse, Basic Gray
Accessories: Scalloped Circle Punch, Midnight Muse Ribbon, Pool Party Ribbon (SAB), Vintage Faceted Designer Buttons, Pool Party Baker's Twine, Glue Dots, Dimensionals
Thanks for stopping by.
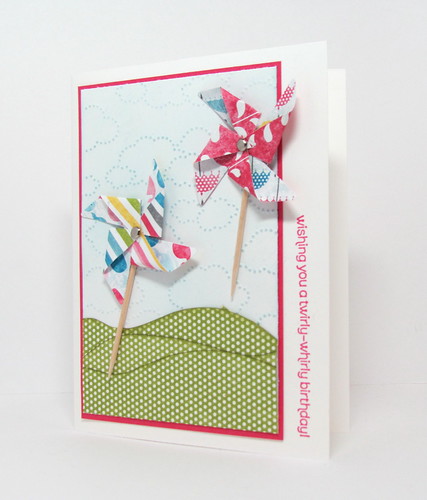
April Stamp Club Card
Supplies:
Stamps: Wishes Your Way
Paper: Sunshine and Sprinkles DSP, Whisper White, Melon Mambo
Ink: Marina Mist, Melon Mambo, Old Olive
Accessories: toothpicks, glue dots, scissors (to cut hills freehand), sponge dauber (to sponge edges of hills), sponge (to sponge clouds), Cloudy Day embossing folder, silver brads, Pinwheel Die
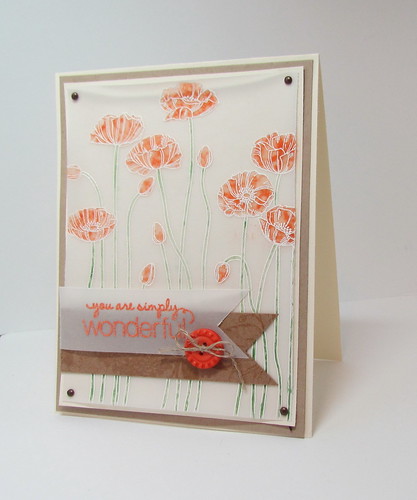
March Stamp Card
I always like cards that have vellum on them. It gives such a nice effect to the card. I saw THIS card on one of my favourite blogs: Limedoodle. I get so much inspiration from her blog. Her cards are very clean and simple. Anyway... I saw her card and this is what I came up with.
Just a few directions:
Stamp the Pleasant Poppies stamp set in Whisper White ink on the vellum card stock. Add white embossing powder and heat carefully. If you heat too much you might either burn the vellum or heat it too much and the vellum curls a bit.
Use markers to colour in the poppies.
On this card, I spritzed the vellum lightly with water and quickly and carefully pressed a kleenex over top to take some of the water off. Don't spray too much or the paper might curl. This gives the poppies a more water coloured or mottled effect. Laying the the piece under some heavy books for a while will also help keep the vellum flat. Note: I did have left over supplies so I made some more of these cards. This time I did not add water and as a result I didn't have to struggle with the curling vellum. So I'm very sorry stamp club members, next time we won't add water to the vellum. I also dabbed at the poppies with a kleenex soon after I coloured one to take some of the ink off. That had a nice effect as well.
On the reverse side, place glue dots behind the poppies to help adhere the piece to the vanilla card stock. Note: If you place glue dots where there is not an image, the glue dots will be seen through the vellum.
Add brads to corners and complete card.
The square punch was used to punch the flags on the vellum and DSP strip.
Supplies:
Stamps: Pleasant Poppies, Friendly Phrases
Paper: Very Vanilla, Crumb Cake, Vellum card stock, Natural Composition Specialty DSP
Ink: Whisper White, Versa Mark
Accessories: Garden Green and Tangerine Tango Markers, White Embossing Powder, Tangerine Tango Embossing Powder, Square Punch, Button (SAB 2013), Linen Thread, Glue Dots, Mini Brads
Dimensions:
Very Vanilla: 11 x 4-1/4(card base), 3-7/8 x 5-1/8
Crumb Cake: 5-3/8 x 4-1/8
Vellum: 3-3/4 x 5, 1" strip
DSP: 1" strip
Thanks for stopping by.
March Stamp Club Card
In January I was looking for some card ideas for my Dad's birthday. I came across THIS on Splitcoaststampers card and absolutely loved it. Plus I pretty much all the supplies which is a bonus. Michelle Zindorf has a great blog with very detailed tutorials. I basically followed her tutorial on making the main image of the the card. So rather then rewriting the instructions, you can check it out for yourself. The card I made for my dad was about 6" x 4-1/2" whereas the card shown above is a regular A2 size: 4-1/4 x 5-1/2.
Supplies:
Stamps: Feeling Sentimental (SAB 2013), Itty Bitty Banners (sentiment)
Paper: Whisper White, Soft Suede, Pool Party
Ink: Soft Suede, Pool Party,
Accessories: Soft Suede Marker, Mini Brads, Honeycomb Embossing Folder, Word Window Punch (retired), Label Punch, Eyelets, 1/8" Circle Punch, Crop-o-dile, Crumb Cake Seam Binding, Linen Thread, Edge Distresser, Spon
ge, Dimensionals
Dimensions:
Whisper White: 8-1/2 x 5-1/2 (card base), 3 x 4-3/4 (main image), scrap
Soft Suede: 4-1/8 x 5-3/8, 3-1/8 x 4-5/8, scrap
Pool Party: 4 x 5-1/4
This is the card I made for my dad. Pretty much the same. Just bigger and there is antique hardware highlighting the sentiment.
Thanks for stopping by.


+of+IMG_8260.jpg)

